How to Add Swap Space on Ubuntu
No matter the size of the RAM, a little swap space always provides a guard against out-of-memory errors.
— Abhishek

Ubuntu system running out of free RAM? Swap is one of the standard ways to provide a cushion against your server going out of memory.
Swap is part of your hard disk storage. When the system is running out of RAM, it temporarily stores the data on this swap space. It is slower than RAM but helps in avoiding application crashes due to out-of-memory errors.
In the traditional approach, swap used to be a separate partition. Things have changed for good.
A simpler option is to use swapfile for adding swap on Ubuntu. It's a special file under the root directory and it is used for storing the swap data. No need for a separate partition. You can easily create, extend and delete swap space with swapfiles.
In this tutorial, I'll share the steps for adding swap space using swapfile in the Ubuntu command line.
Adding swap on Ubuntu
I deployed an Ubuntu server on DigitalOcean for one of my websites. I was surprised to see that it had no swap space. My Ghost server had a memory spike and it made the server struggle.
This is when I decided to add swap to my Ubuntu server.


Step 1: Check if your system has swap space
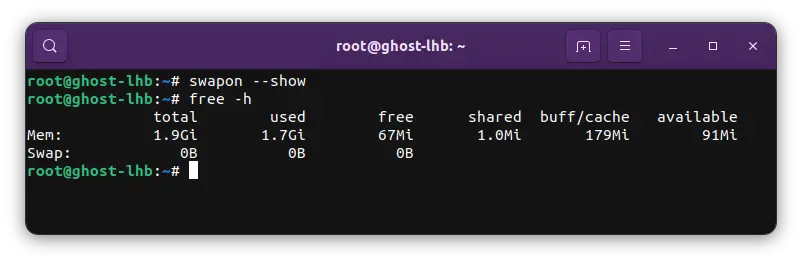
You can check if swap is active on your system by using the free command:
free -hAlternatively, you can see if there is any swap configured for your system using this command:
sudo swapon --showIf you don't see any output for the above command, it means your system doesn't have any swap space.
Here's an example. I check the RAM on my Ubuntu server. You can see that this system is struggling for free memory and there is no swap space on the server.
Step 2: Make sure that your system has enough free disk space
The general practice is to have a swap space of either the same size or double the RAM. If your Ubuntu server has 2 GB RAM, you should go for a 2 GB or 4 GB swap.
This is an optional step but it is a good idea to check if your system has enough free disk space to accommodate the swap file.
Run the following command to see the disk space used by the root (mounted on /):
df -h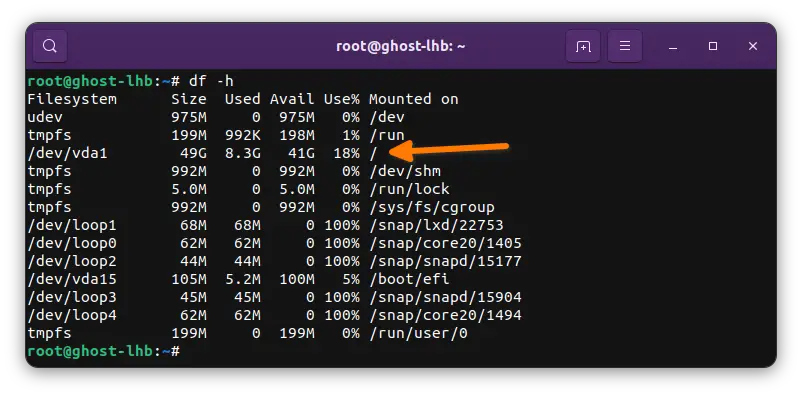
Don't go too close to 100% of disk space utilization, of course. Keep enough free space on the server for log files and dumps.
Step 3: Create a swap file of the desired size
Based on the free space available on your Ubuntu system, you can decide the size of the swap. As mentioned above, swap space should be the same size or double that of RAM size.
My server has 2 GB of RAM and I am going to add 2 GB of swap.
Once you have decided on the swap size, your next step is to create a swap file. It's nothing but a file under root; /swapfile.
Now, you can create a new file in the Ubuntu command line but it will be empty with zero bytes size. So, how do you create a file with a specified size? Thankfully, there is a wonderful Linux command, fallocate, that creates new files with specified sizes.
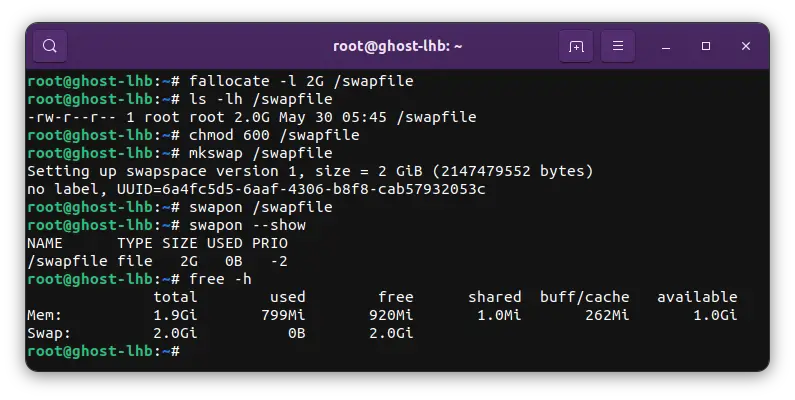
sudo fallocate -l 2G /swapfileYou can verify the size of the newly created swapfile:
ls -lh /swapfileIn my case, I have /swapfile with the size of 2 GB:
-rw-r--r-- 1 root root 2.0G May 30 05:45 /swapfileLooking all good. Let's move to the next step.
Step 4: Enable the swap file
You have a /swapfile of the desired size. But your system doesn't know that it is to be used for swap space yet. You have to tell it that.
But first, make the file accessible to root only by changing its file permissions:
sudo chmod 600 /swapfileNext, mark the file as swap:
sudo mkswap /swapfileIt may take a little time and then you should see an output like this:
Setting up swapspace version 1, size = 2 GiB (2147479552 bytes)
no label, UUID=6a4fc5d5-6aaf-4306-b8f8-cab57932053c
So far, so good. You have got a swapfile ready to be used as swap. Enable the swap file so that your Ubuntu system starts using it:
sudo swapon /swapfileIt would be a good idea to verify if your system sees the swap or not:
sudo swapon --showYou should get an output this time:
NAME      TYPE  SIZE USED PRIO
/swapfile file    2G   0B   -2
A screenshot of the above steps:
Step 5: Make the changes permanent
Almost there. The swapfile has been created and it is already being used. That's good.
But if you reboot your Ubuntu system, you'll have to manually enable swap again. You don't want to do that after each boot, do you?
To let your system retain the swap space automatically, add the swap file to the /etc/fstab file.
For the sake of it, make a backup of the existing /etc/fstab file:
sudo cp /etc/fstab /etc/fstab.bakNext, add the swapfile to fstab file:
echo '/swapfile none swap sw 0 0' | sudo tee -a /etc/fstabThat's it. You are all done here.
Conclusion
So, you have successfully added swap space to your Ubuntu system.
It's not as effective as real RAM but you cannot just add more RAM for occasional memory spikes. Swap is better in such cases.
Life is so much easier with the swap file. You can modify the swap space without even rebooting your system. Managing an actual swap partition would not be so easy.
