Enable log rotation in Ubuntu
The log rotation saves disk space by archiving logs into smaller, compressed files and thus allowing you to have a larger log history.

If you have been using Linux for a while, you must have come across the log files that keep records of important activities over time which plays a crucial role while troubleshooting the system.
But if you keep on using a single log file for a long, then it can become very large and can be difficult to access the important data.
There comes the concept of log rotation where your system creates an archive of the old log file and uses a new log file once it reaches the specified limit or time.
Which eventually makes it easy to access important log files without losing the old data.
Not only that. You can also enable compression to save the disk space. GBs of log files are then compressed into a few MBs.
So in this tutorial, I will walk you through how you can enable and configure log rotation in Ubuntu.
How to enable log rotation in Ubuntu
The good news is the log rotation comes pre-installed in the modern release of Ubuntu and to check if it is installed or not, use the following command:
logrotate --version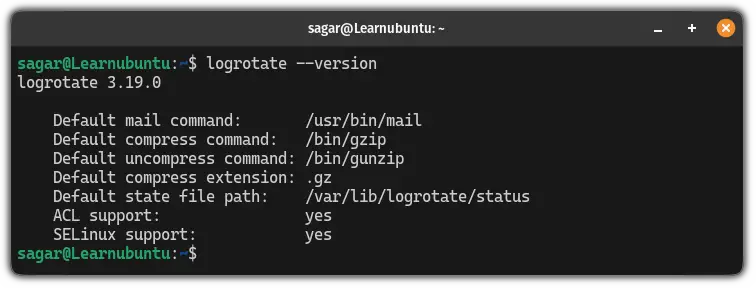
But if it shows an error, then you can use the following command to install logrotate in Ubuntu:
sudo apt install logrotateI know just the installation part won't do any justice so in this guide, I will walk you through the following:
- Exploring the systemwide and independent configuration
- Choosing the appropriate logrotate strategy
In simple terms, I will be covering all the basics for logrotate in this tutorial.
The directories of logrotate
The logrotate uses configuration files to perform all the operations that are found in the following directory:
/etc/logrotate.conf: This is the main configuration file of the logrotate which is globally applicable unless there is an individual configuration file for that application in the/etc/logrotate.ddirectory./etc/logrotate.d: This is the directory where you will find files that define policies for individual log rotation for specific applications or services.
Now, let's explore these two directories to learn more about the logrotate.
The /etc/logrotate.conf file (global logrotate config)
As I mentioned earlier, the /etc/logrotate.conf config file defines the logrotate policies globally and you can view its file contents using the cat command:
cat /etc/logrotate.conf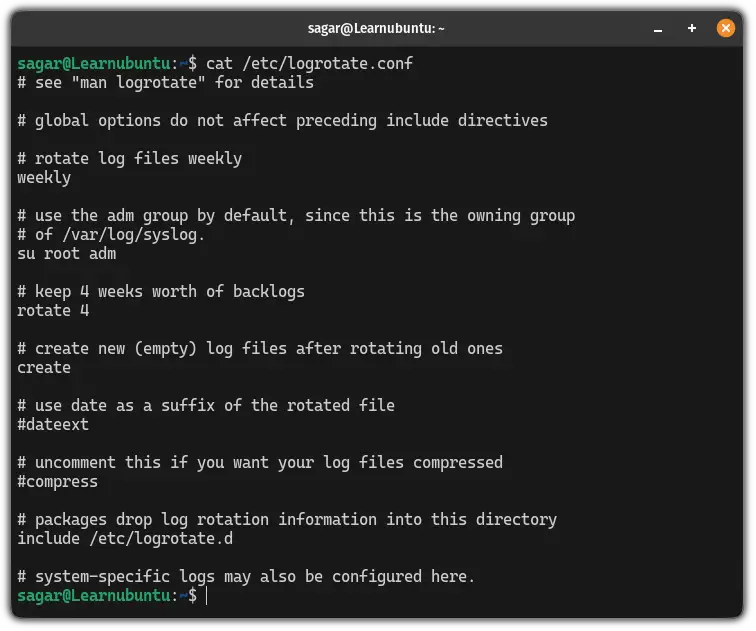
Here, you will find the description of each directive starting with the hashtag # but I will share more details for a better understanding:
weekly: It shows the frequency of log rotation and by default, it will be performed weekly. Alternatively, you can also usehourly,daily,monthly, oryearly.su root adm: It means the root user and the admin group performed the log rotation.rotate 4: This means it will keep a maximum of 4 rotated log files for each that is configured to manage and once it reaches the limit (4 log files in our case), it will start removing the oldest log file.create: It will create a new log file right after the rotation or compression of the old one.dateext: When enabled, it will add the current date of the rotated log file such asexample.log-20231130.compress: It will compress the rotated log file to reduce the log file size.include: This option allows you to add additional configuration files from a specific directory. This way you can organize the configuration files which makes it easy to manage them.
Sounds interesting. Right?
Now, let's explore the /etc/logrotate.d directory.
The /etc/logrotate.d directory (individual config)
You will find the application names inside the /etc/logrotate.d directory which are supposed to behave differently than the global logrotate policies.
To know what applications are configured separately for log rotation, you can list the content of the /etc/logrotate.d directory using the ls command:
ls /etc/logrotate.d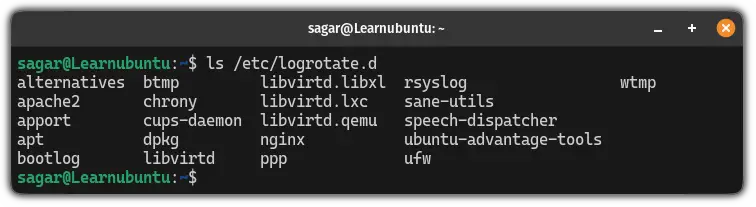
Now, let's explore what is inside of these configuration files.
For this tutorial, I will be using the rsyslog configuration file which can be accessed using the cat command as shown:
cat /etc/logrotate.d/rsyslog
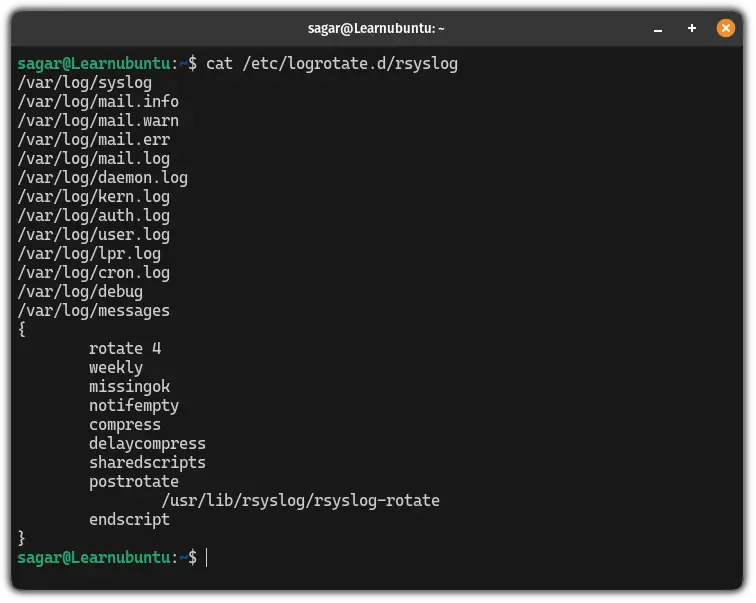
At the beginning of this file, you'll see various lines starting with /var/log which are nothing but log files that are effective from the configuration written between curly brackets {}.
Let's explore what every line in the configuration means.
missingok: This option is used to ignore errors if the specified log files are missing.notifempty: It is used to ensure that log rotation should only occur if the log file is not empty which helps reduce the multiple copies.delaycompress: Used to delay the compression of the rotated log file till the next rotation cycle so the most recent log file remains uncompressed for ease of access.sharedscripts: It ensures that the scripts specified in thepostrotateandprerotatesections are executed only once for all the logs being rotated rather than once per log.
In simple terms, it will run the specified script only once for all logs not separately for each log.postrotateandendscript: Between these two, you include the script or command that needs to be executed after the log rotation. In our case, it is/usr/lib/rsyslog/rsyslog-rotate.
Choosing the right strategy for log rotation
There are two ways you can perform log rotation: Create and copytruncate.
You may be wondering what's the difference between these two. Well, the only difference is how they deal with the creation of the new log file.
So let's address them one by one.
The default option: Create
As the title suggests, this is the default option in the log rotation and it works in 3 simple steps.
Let's suppose there's an original log file called example.log which needs to be rotated so here's how it will work:
- The rotation will be triggered based on the condition of time or size.
- The original log file will be renamed or related and may include the timestamp or the number annotation at the end such as
example.log.1. - The new log file will be created with the previous name (
example.login our case) at the same location for seamless logging.
In simple terms, it will rename or relocate the old log file and create a new one with the same name.
The copytruncate option
As the name suggests, it will first create a copy of the log file and then truncate (empty) the original log file. If you are curious, here's how it works in a step-by-step manner:
Let's assume that there's a log file named example.log which needs to be rotated. Here's how copytruncate will do it in 2 simple steps:
- The log rotation will be triggered based on the condition.
- It will copy the contents of the original log file
example.logand write them to the new fileexample.log.1. - After copying data to the new file, it will truncate (empties) the original log file
example.log.
The main benefit of using this approach is you get the ability to continue logging.
Which one to choose
If you are working with servers and want the continue logging then going with the copytruncate is the best (and only) option you have.
Whereas if getting clean logs is important and you can compromise with additional disk usage (just a little more) then go with the create.

A software engineer who loves to tinker with hardware till it gets crashed. While reviving my crashed system, you can find me reading literature, manga, or watering my plants.