Install ImageMagick on Ubuntu
Can't find ImageMagick installed on your system? Here's how to install it on Ubuntu.

Using ImageMagick, you can manipulate images in almost every possible way, and that too by supporting more than 200 image formats!
And being a crucial dependency, ImageMagick comes pre-installed (even on an Ubuntu server) or gets installed as a dependency when you attempt to install packages.
The problem is that the command for using ImageMagick is convert. Many users make the mistake of using imagemagick.
Check if ImageMagick is already installed with this command:
convert --version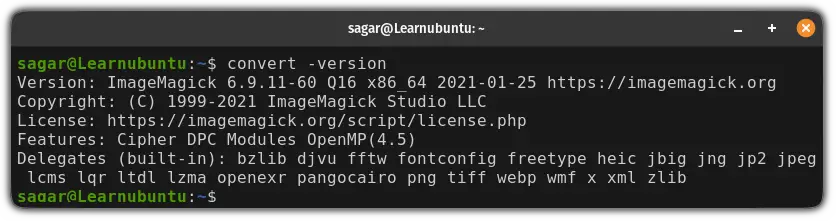
But for some reason, if it shows an error, you can refer to the following guide to install ImageMagick on Ubuntu.
How to install ImageMagick in Ubuntu
In this guide, I will walk you through 2 ways to install ImageMagick on Ubuntu:
- Using apt package manager (easy and recommended)
- Installing it from source (to have the most recent version possible)
So let's start with the first one.
1. Install ImageMagick on Ubuntu using Apt (easy and recommended)
If you don't care about having the latest version and want to get your job in the fastest and easiest way possible, this is for you.
To install ImageMagick using apt, all you have to do is execute the following command:
sudo apt update && sudo apt install imagemagickMind the extra k at the end. Many users make mistake and think it is imagmagic.
The above command will update the repository index and get you the latest version of ImageMagick available in the repository.
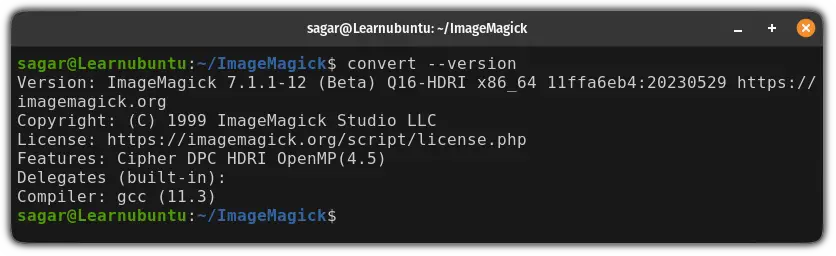
Once done, you can check the installed version using the following:
convert --version
While writing, I got the ImageMagick version 6.9.11.
How to uninstall (avoid it)
If the installed version is too old for your needs or you just want to remove it, here's a single command to do so:
sudo apt remove imagemagick* -yThat's it!
2. Install the latest version of ImageMagick on Ubuntu (complicated)
To build ImageMagick from source, first, you'd have to install some prerequisites using the following command:
sudo apt install git build-essential makeOnce done, clone the git repository using the following:
git clone https://github.com/ImageMagick/ImageMagick.gitNext, change your directory to ImageMagick:
cd ImageMagickNow, execute the configure script to check the dependencies:
./configureThen, use the make command to build packages:
makeAnd finally, install the packages using the following:
sudo make installOnce done, use the following command to configure the dynamic linking:
sudo ldconfig /usr/local/libThat's it! You have the latest version of ImageMagick installed on your system.
While writing, it gave me ImageMagick version 7.1.1-12:
How to uninstall:
If you want to remove the ImageMagick installed from the source, here are simple steps you need to follow.
First, change your directory to ImageMagick:
cd ~/ImageMagickAnd use the following command to remove it:
sudo make uninstallThat's it!
Just getting started? Here are the essentials
If you are just getting started with the Ubuntu command line, we have a dedicated guide on must-to-know commands in Ubuntu:

I hope you will find this guide helpful.

A software engineer who loves to tinker with hardware till it gets crashed. While reviving my crashed system, you can find me reading literature, manga, or watering my plants.