Unzip gz Files in Ubuntu Command Line
Learn to extract .gz files in the Ubuntu command line with gzip and unzip commands.

In Linux, while installing packages manually, you will get the files in compressed form and often they will have the .gz extension.
Extracting the gz files is simple. You use the same gzip command that is used for creating the gz compressed files. Use the -d option for decompressing the files:
gzip -d file.gzBut there is more to unzipping .gz file than the above example. Let's see it in detail.
How to unzip gz files in Ubuntu
To learn how to use any command, it is necessary to know the command syntax first. So here's the syntax for the unzip command:
gzip [OPTIONS] [FILE]Here,
[OPTIONS]: Using options, you can adjust the default behavior of the command.[FILE]: This is where you will enter the filename/directory you want to work with using the gzip command.
gzip -d is equivalent to gunzip command. Some people find it more convenient to distinguish between compressing (gzip) and extracting (gunzip). You can use gunzip in all the examples discussed here.Now, let's have a look at some examples.
1. Extracting gz file in Ubuntu
To uncompress a single file, all you have to do is the -d option with the gzip command and add the filename or the absolute path to the file:
gzip -d File.gzSo let's say I want to decompress the LU.txt.gz file, then I will be using the following command:
gzip -d LU.txt.gz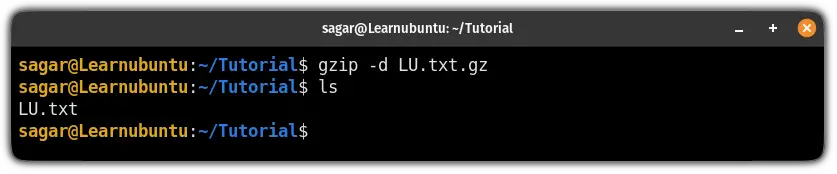
Similarly, if you want to extract multiple files, you will have to append their names or absolute paths followed by the space as shown:
gzip -d File1.gz File2.gz File3.gz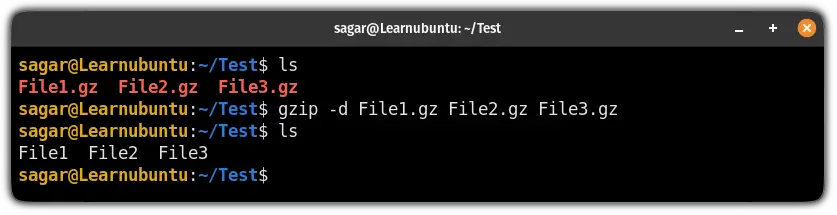
2. Decompress gz files while keeping the original intact
If you notice, while extracting the files, the gzip command removed the original compressed archive, which is not the desired way of extracting files.
To tackle that, you can use the -k flag which will keep the original files when you extract them:
gzip -dk File.gzHere, I wanted to keep the original archive named Learnubuntu.gz while extracting the file content, so I used the following command:
gzip -dk Learnubuntu.gz
3. Check the contents of gzip file instead of extracting it
Sometimes you just want to make sure that the file you are about to extract is the one. So in that case, you can check the file contents before extracting it using the -l option:
gzip -l File.gz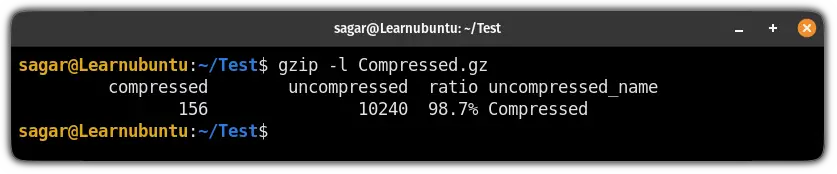
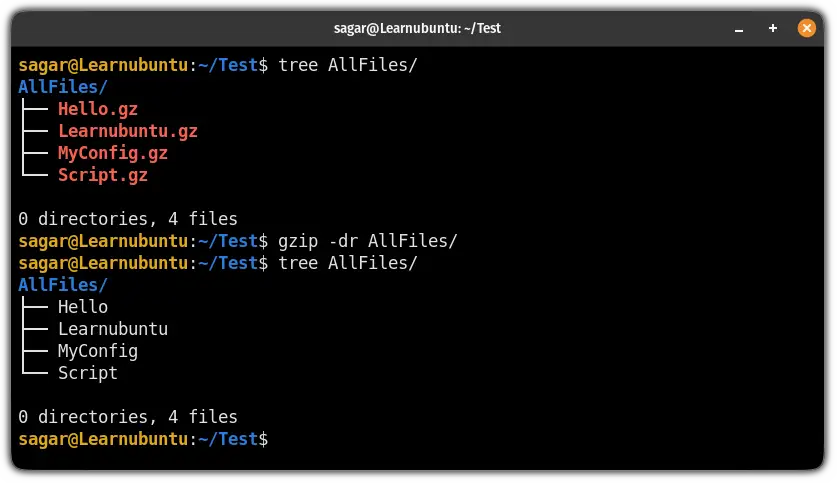
4. Uncompress files recursively
Suppose that you have one directly that contains all the .gz files and if you are asked to extract all of them.
Sure, you can name them one by one as I explained earlier, but I'm talking about hundreds of files here.
So in that case, you can extract those files recursively using a single command.
To do so, you will have to use the -r option and append the directory containing all the files as shown:
gzip -dr directory/Let's say I want to extract all the files inside the AllFiles directory, so I have to use the following command:
5. Rename the gzipped file while extracting it
While extracting the archive, you may want to change its name and in that case, you will have to use -c option which will extract the file in standard input and redirect the output to the new filename as shown:
gzip -dc File.gz > Renamed_FileFor example, here, I have renamed the Learnubuntu.gz which was a text file to the Ubuntu.txt:
gzip -dc Learnubuntu.gz > Ubuntu.txt
And it is working as intended!
More on dealing with file compression
More on zipping files and folders can be found in this tutorial.

If you have got a .zip file instead, use the unzip command to extract it.

If you are using traditional methods like gzip to compress files, they are pretty slow as they are designed to use a single thread at a time. This can be a headache when you have to compress multiple large files.
The pigz utility can speed up the process by 6 to 7 times.

I hope you will find this helpful. And if you have any queries, feel free to ask in the comments.

A software engineer who loves to tinker with hardware till it gets crashed. While reviving my crashed system, you can find me reading literature, manga, or watering my plants.