Install and Use Nginx in Ubuntu
Nginx is one of the most popular open source web servers. Learn to install and configure it on Ubuntu.

NGINX is a web server that is widely used to host websites as you have multiple options for configuration and it is free and open-source in nature.
In this tutorial, I will walk you through the following:
- Installing Nginx in Ubuntu
- Using Nginx in Ubuntu
So let's start with the first one.
How to install NGINX in Ubuntu
To install NGINX in Ubuntu, all you have to do is execute the following command:
sudo apt update && sudo apt install nginxTo verify the installation, you can check the installed version of NGINX:
nginx -v
If you're using a UFW firewall, then you have to set a rule in the UFW firewall to pass through it.
And in that case, you can use either of the 3 profiles:
Nginx Full: Opens both port 80 (for normal unencrypted traffic) and 443 (For TLS/SSL encrypted traffic).Nginx HTTP: Only opens port 80.Nginx HTTPS: Only opens port 443.
So you may choose any of the three as per your needs. I'm going with the first one:
sudo ufw allow Nginx FullOnce done, let's start the Nginx service using the following command:
sudo systemctl start nginxYou may want to start the Nginx service automatically at the system boot and in that case, enable the Nginx service using the following:
sudo systemctl enable nginx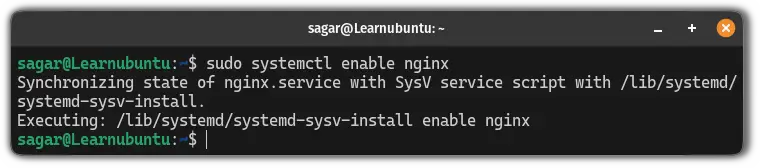
To learn more about how you can start, stop, enable, and disable service, refer to our detailed guide on using the systemctl command:

Now, let's skip to how you can configure a server block on Nginx.
How to use NGINX in Ubuntu
In this section, I will walk you through how you can create a simple webpage using the Nginx web server in Ubuntu.
The first step is to unlink the default Nginx webpage using the following command:
sudo unlink /etc/nginx/sites-enabled/defaultNext, you need to create a new configuration file for your Nginx webpage where you will be specifying the port number, domain name, and filename.
First, open the configuration file using the following command:
sudo nano /etc/nginx/sites-available/<domain_name>For example, I went for the sudoersagar.com domain name, then I will be using the following:
sudo nano /etc/nginx/sites-available/sudoersagar.comOnce you open the file, paste the following lines in your file by replacing the <domain_name> with your domain name:
server {
    listen 80;
    listen [::]:80;
    server_name  <domain_name>;

    root /var/www/<domain_name>;
    index index.html;

    location / {
        try_files $uri $uri/ =404;
    }
}
Mine looks like this:
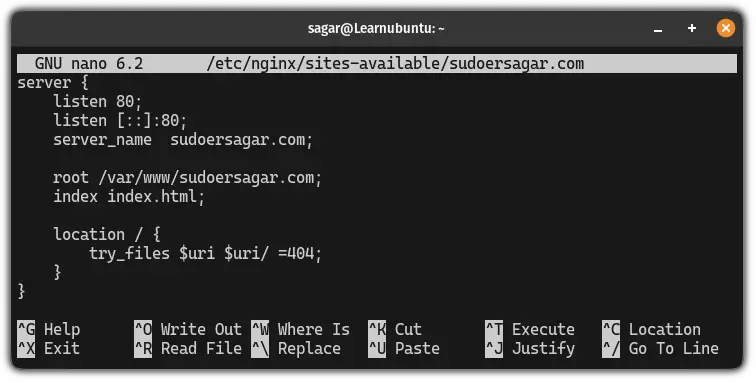
Here, I've mentioned the root directory for my website where the Nginx server will look for files to serve.
In the next line, I've mentioned the index file (a default webpage) for my site.
The last part is a location block which will define how Nginx will handle the requested files. The try_files part will check if the file exists and if not, then will return a 404 error.
In simple terms, when someone requests for sudoersagar.com, the Nginx server will show the contents of the index.html located in /var/www/sudoersagar.com.
The next step is to create a symbolic link to enable the Nginx site:
sudo ln -s /etc/nginx/sites-available/<domain_name> /etc/nginx/sites-enabled/As my domain name is sudoersagar.com, I'd have to use the following:
sudo ln -s /etc/nginx/sites-available/sudoersagar.com /etc/nginx/sites-enabled/Finally, text the configuration you've done so far using the following:
sudo nginx -t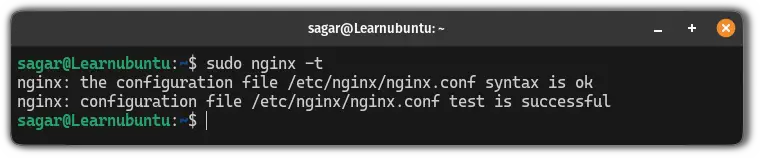
Now, restart the Nginx service using the following command:
sudo systemctl restart nginxCreate a webpage for the Nginx web server
In the previous part, I explained how you can create a configuration file for Nginx which will point to the index file to serve the request.
But I'm yet to show you how you can create the index page.
First, create a directory for the Nginx web server:
sudo mkdir /var/www/<domain_name>In my case, the command to create a directory would look like this:
sudo mkdir /var/www/sudoersagar.comNow, create an index file inside the recently created directory:
sudo nano /var/www/<domain_name>/index.htmlMake sure you replace the <domain_name> with your domain name in the above command.
Once you execute the above command, it will open an empty file where you can use HTML and CSS for your index page.
I went with a basic page:
<!doctype html>
<html>
<body>
    <h1>Hello from sagar sharma!</h1>
    <p>I hope this paragraph gets displayed on the test site (fingers crossed).</p>
</body>
</html>
Finally, save changes and exit from the nano text editor.
Now, open your web browser, and if you have configured Nginx on the local machine, then you can use the following:
http://localhostIf configured on the remote server with the domain name configured, you will have to enter the domain name in the following manner:
http://domainnameMine looks like this:
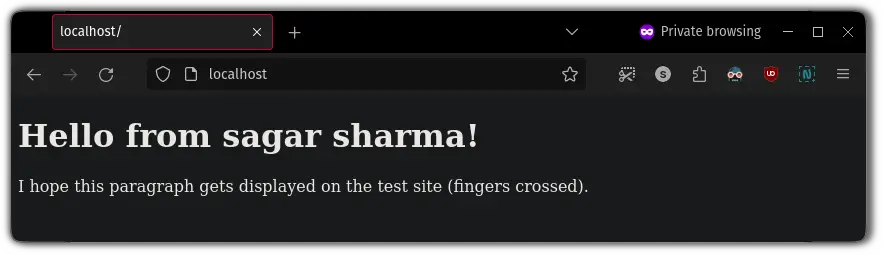
There you have it!
Configure NGINX with an SSL certificate
Using an SSL certificate you can ensure the security of your website and adding an SSL certificate will also allow you to use the https instead of http.
So here's a detailed guide on how you can use Nginx with SSL certification:

I hope you will find this guide helpful.

A software engineer who loves to tinker with hardware till it gets crashed. While reviving my crashed system, you can find me reading literature, manga, or watering my plants.