Uninstall Java From Ubuntu
Got several Java packages on Ubuntu and now want to remove them? Here's how to uninstall Java from Ubuntu.

Once you are done with your Java projects, you may want to remove Java from Ubuntu.
So in this guide, I will walk you through the uninstallation process for different scenarios:
- Removal process if you used the apt package manager for the installation
- Uninstallation if you manually installed
.debpackage
So let's start with the first one.
How to uninstall Java from Ubuntu using apt
There are 2 ways by which you can install Java in Ubuntu:
- Using JDK
- Using JRE
And using Ubuntu, you can also specify which version you want to install of JDE and JRE.
So I will be addressing all of them.
Remove JDK from Ubuntu (Default version)
So if you installed a default version given by the apt of JDK, you will have to use the following command to remove the JDK:
sudo apt remove default-jdkRemove JRE from Ubuntu (Default version)
And if you've installed the default version of JRE with apt, all you have to do is execute the following command for removal:
sudo apt remove default-jreBut what if you went with a specific version of JDK and JRE?
Remove a specific version of JDK from Ubuntu
So if you've installed a specific version of JDK, for removal, you will have to execute the apt remove command in the following manner:
sudo apt remove openjdk-[version_no]-jdkFor reference, I have installed JDK version 17 so if I were to remove it, I will be using the following:
sudo apt remove openjdk-17-jdkRemove a specific version of JRE from Ubuntu
If you installed a specific version of JRE on your Ubuntu machine, you can use the similar command syntax as above to remove JRE:
sudo apt remove openjdk-[version_no]-jreSo let's say I want to remove the JRE version 17, then, I will be using the following:
sudo apt remove openjdk-17-jreHow to remove Java manually from Ubuntu
This section is useful for those who used the .deb file to install Java in Ubuntu.
The first step is to find the name of the installed package as you have to know the exact name of the package for removal.
To do so, here, I will be using the grep command with the apt command:
apt list --installed | grep -w 'jdk\|local'If you get multiple results, look for the [installed,local] and the first word will be the package name:
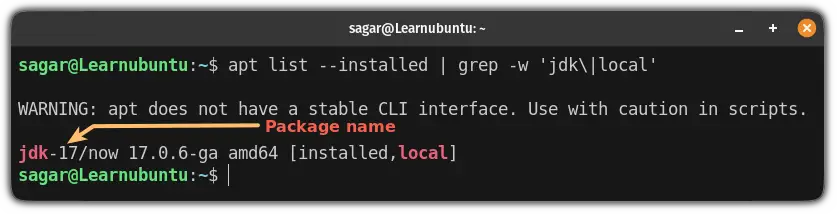
Once you find the package name, you can use the traditional apt remove command to remove the package:
sudo apt remove [package_name]In my case, its jdk-17 so I will be using the following command for uninstallation:
sudo apt remove jdk-17And that's it!
Want to install Java again? Here you have it
In case you want to install Java again, we have a detailed guide for that purpose covering almost every aspect of installing Java:

I hope you will find this guide helpful.
And if you have any questions, drop a comment.

A software engineer who loves to tinker with hardware till it gets crashed. While reviving my crashed system, you can find me reading literature, manga, or watering my plants.