Using the chmod Command on Ubuntu
Learn about changing file permissions in Ubuntu terminal with the chmod command.

As Linux is built to have multiple users at the same time, you are given multiple file permissions for reading, writing, and execution.
If you are using Linux for while or just getting started, you will have to deal with file permissions a lot. You can change the file permissions with the chmod command.
In this article, I'll share a few examples of using the chmod command for changing the file permissions.
Basics of File permissions
Before I jump to the chmod command part, it is necessary for you to know the file permissions in Linux.
To know permission for any file, all you have to do is append the filename to the ls command with the -lh flag:
ls -lh filename
Doesn't tell much. Right?
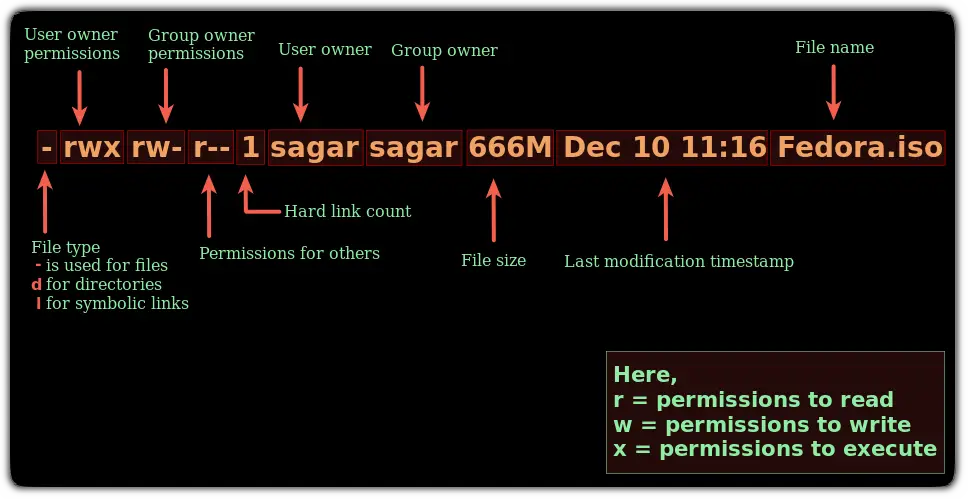
Well, here's a simple illustration to make things easy to digest:
To learn more about file permissions, I would highly recommend the other guide of ours going in depth of file permissions:

Now, let's jump to the chmod command examples.
Chmod command examples
To execute the chmod command, you will need to follow the given command syntax:
chmod [options] filenameWhere in the options, you are supposed to use numbers as flags to change the permissions:
| Number | Permission | Description |
|---|---|---|
| o | --- | No permissions |
| 1 | --x | Execute only |
| 2 | -w- | Write only |
| 3 (i.e. 2+1) | -wx | Write and execute only |
| 4 | r-- | Read-only |
| 5 (i.e. 4+1) | r-x | Read and execute only |
| 6 (i.e. 4+2) | rw- | Read and write only |
| 7 (i.e. 4+2+1) | rwx | Read, write and execute |
But if you want to use the chmod command in symbolic form, you can also do that by following the syntax:
chmod [Options] [Operator] FilenameIn symbolic form, you have 4 options to choose the permissions:
uindicates user ownergindicates the group owneroindicates othersais used for all (user, group, and others)
For [Operator], it accepts the following:
+is used to add specified permissions-is used to remove specified permissions=is used to define exact permissions for another user
Now, let's have a look at examples.
1. Set read by owner only: chmod 400
If you want your file with read-only permission for owners only and zero permissions for others, you can use chmod 400 as shown:
chmod 400 filename
The same can be done with the symbolic mode:
chmod u=r testfile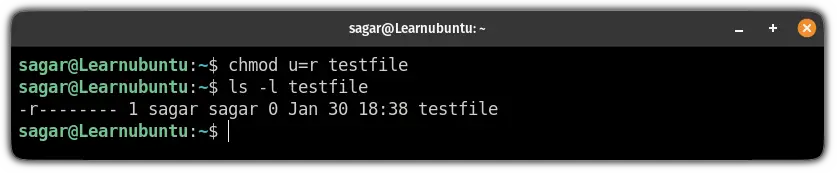
2. Allow execution permissions to everyone: chmod 111
If you want to allow everyone to execute a specific file, it can easily be done using the chmod 111:
chmod 111 testfile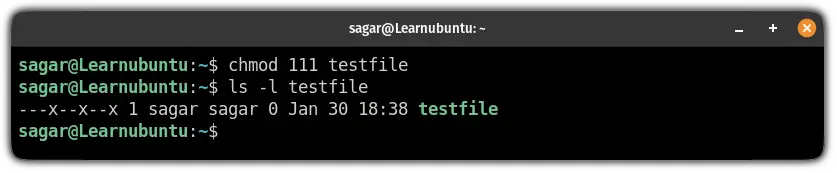
And if you prefer symbolic form, here you have it:
chmod a=x testfile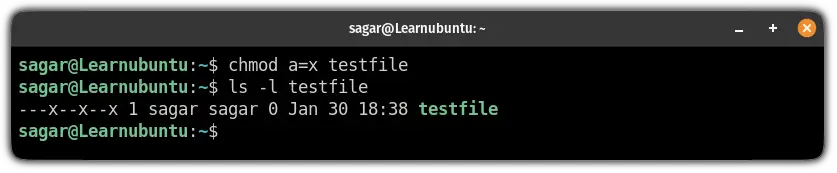
3. Write only by the owner: chmod 200
If you want the write permissions restricted to the owner, you can use chmod 200:
chmod 200 testfile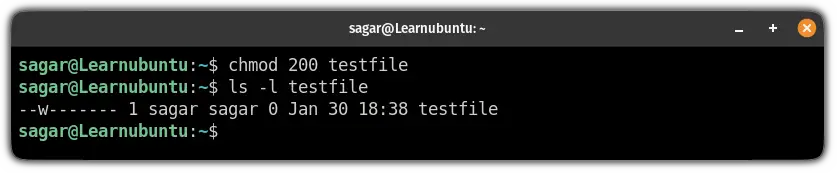
And if you want to do the same in symbolic mode, use the following:
chmod u=w testfile
4. Change permissions recursively
If you want to have the same permissions for the whole directory, you can apply the same permissions using -R flag and it will have a recursive effect:
chmod -R [permission] Target_DirectorySo let's say I want to allow every user to read, write and execute the contents of LU directory, I will be using the following:
chmod -R 777 LU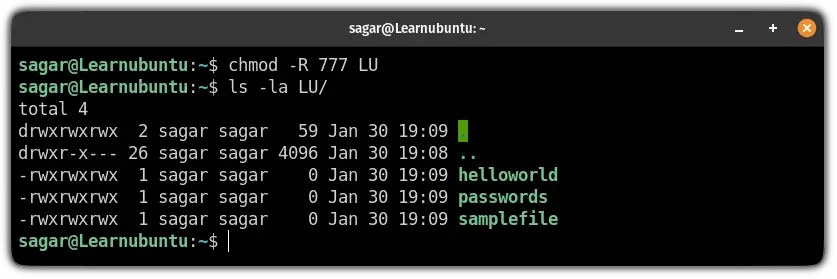
And if you wish to do the same using symbolic mode:
chmod -R a=rwx Target_Directory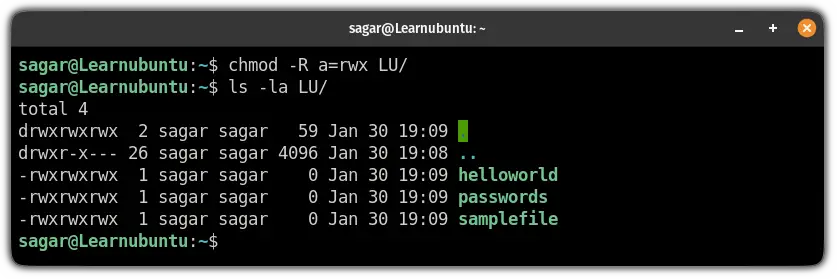
5. All rights to owners and others are limited to read-only: chmod 744
If you want the file owner to have every permission and want to limit others to read-only, use chmod 744:
chmod 744 testfile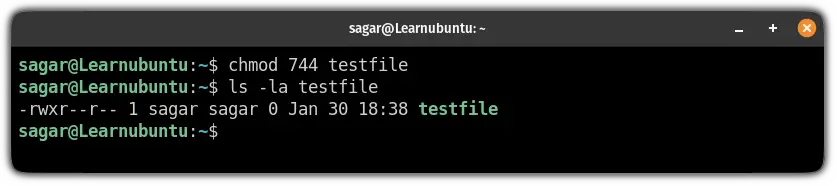
For symbolic mode:
In times when you want to have different permission for user owner, group owner, and others, you are required to add permissions for them separately.
So if I want to have all rights for the owner and others should be limited to read-only, I will use the chmod command in the following way:
chmod u=rwx,g=r,o=r testfile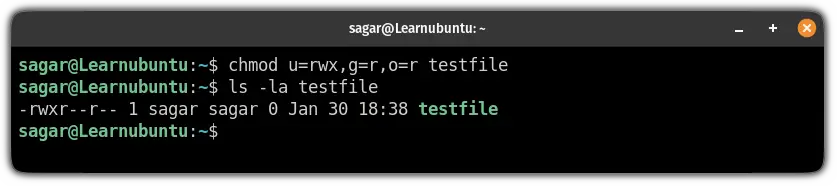
Pretty straightforward. Right?
But what about changing the file ownership?
That was all about changing file permissions. As I discussed in the betginning of this article, there is also the ownership. You can change file ownership with the chown command.

I hope you will find this guide helpful. If you face any issue while command execution or want to suggest what should I cover next, let me know in the comments.