How to Install Kibana on Ubuntu
Learn how to install Kibana on Ubuntu in proper way so that you can keep getting updates from official sources.

If you are into Elastic Stack, Kibana can enhance your experience by allowing users to navigate through the search data visually.
And guess what. You get an apt repository for a seamless installation and update experience on Ubuntu.
Let's see how to get started with Kibana.
Installing Kibana in Ubuntu
Kibana also provides deb file. You can install the deb file easily in the command line. However, I won't recommend that.
There is a better way to install Kibana on Ubuntu from official sources. You add the official Kibana repository to our system. This way you can easily install it and you also get the regular updates directly from the developers.
You need to get the dependency package to get apt packages through https.
sudo apt install apt-transport-httpsAnd then the next step will be adding the public signing key:
wget -qO - https://artifacts.elastic.co/GPG-KEY-elasticsearch | sudo gpg --dearmor -o /usr/share/keyrings/elasticsearch-keyring.gpgNow, it's time to save the repository definition at /etc/apt/sources.list.d/elastic-8.x.list:
echo "deb [signed-by=/usr/share/keyrings/elasticsearch-keyring.gpg] https://artifacts.elastic.co/packages/8.x/apt stable main" | sudo tee /etc/apt/sources.list.d/elastic-8.x.listOnce you're done with saving the repository definition, you can use the given command to update repositories cache and install Kibana in Ubuntu:
sudo apt-get update && sudo apt-get install kibanaConfiguriung Kibana in Ubuntu
This section will cover some basic steps such as changing firewall rules, specifying server host, etc. So let's start the firewall part.
Changing Firewall rules to allow network access
First, check the status of the firewall. If it is enabled, you need to change the firewall rules.
Kibana uses port no 5601 by default. Check the open ports and if it's cloese, allow this port through the firewall:
sudo ufw allow 5601It should show that the rules are updated.
sagar@Learnubuntu:~$ sudo ufw allow 5601
Rules updated
Rules updated (v6)
Specifying server host and Elasticsearch server
It may sound complex but it's just uncommenting lines from the config files.
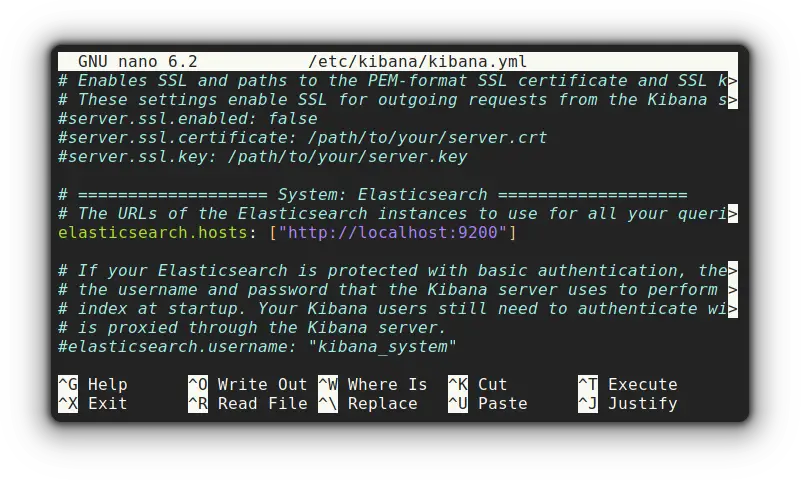
Open the config file by the given command:
sudo nano /etc/kibana/kibana.ymlUncomment the line starting with server.host and specify the host IP for remote access:
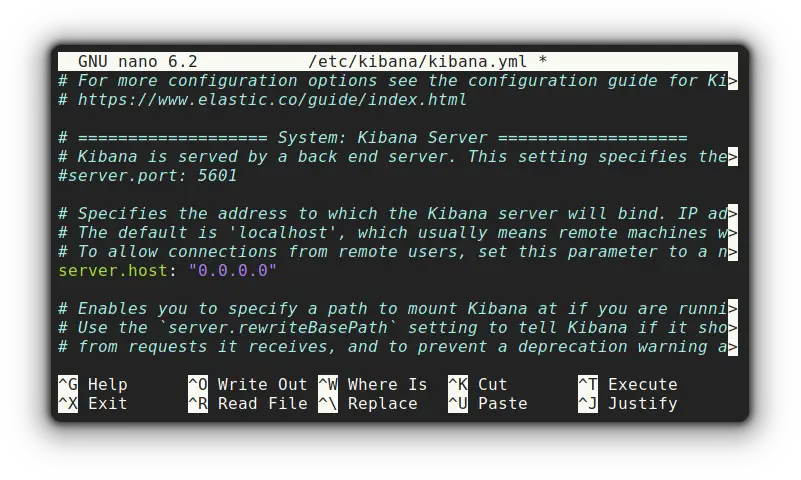
Similarly, you have to uncomment elasticsearch.hosts line and specify the Elasticsearch server:
Start Kibana automatically at every boot
You guessed it right! It is the same old command involving the usage of systemd. So let's enable Kibana to start automatically at every boot:
sudo systemctl enable kibana While the above command is meant to start Kibana at every boot, you can use the given command to start it now:
sudo systemctl start kibanaIt's time to put those configs to the test. For that, I'll be starting the browser with port no 5601:
curl -L 127.0.0.1:5601And it should get you the HTML output:
sagar@Learnubuntu:~$ curl -L 127.0.0.1:5601
<!DOCTYPE html><html lang="en"><head><meta charSet="utf-8"/><meta http-equiv="X-UA-Compatible" content="IE=edge,chrome=1"/><meta name="viewport" content="width=device-width"/><title>Elastic</title><style>

        @font-face {
          font-family: 'Inter';
          font-style: normal;
          font-weight: 100;
          src: url('/ui/fonts/inter/Inter-Thin.woff2') format('woff2'), url('/ui/fonts/inter/Inter-Thin.woff') format('woff');
        }
Wrapping Up
On a related topic, you can learn about installing Grafana on Ubuntu.

That's it. You can now enjoy Kibana on Ubuntu. Don't worry about updating it. It gets updated along with system updates. How cool is that!

A software engineer who loves to tinker with hardware till it gets crashed. While reviving my crashed system, you can find me reading literature, manga, or watering my plants.