Send Emails from Ubuntu Command Line
Here's a detailed tutorial that shows you the steps for using a Gmail like service to send emails from your Ubuntu server.

Sending emails from the command line? Is that even a thing?
The coolness and wow factors aside, setting up mail on an Ubuntu server has its usage.
As a smart sysadmin, you can get email notifications when the CPU usage is high, the disk runs out of space, or a cronjob fails to run.
What you want to get notified about requires some scripting from your side, but to get any kind of notification by email, you need to set up mail on your server first.
This is not a straightforward task as several ifs and buts are involved. You need a domain name associated with the server to send the emails. That may not always be the case if you have a test server or a server that doesn't run a domain-oriented web service.
An approach here would be to use your regular Gmail address for sending emails from your servers to any address. This requires additional steps but this saves you a lot of trouble in the long run.
The steps involved are:
- Setup Gmail (or other email services) to send emails from a custom domain
- Installing and setting up SMTP on your server
- Sending emails from the command line
Let's see how to do it.
Step 1: Generate an app-specific password from Gmail
For this tutorial, I am presuming the following things:
- You are using Google as your e-mail provider
- You have 2 Factor Authentication enabled (the steps to do so on GMail are documented here)
Once you have 2FA enabled, please visit this link to generate an 'app-specific password.'
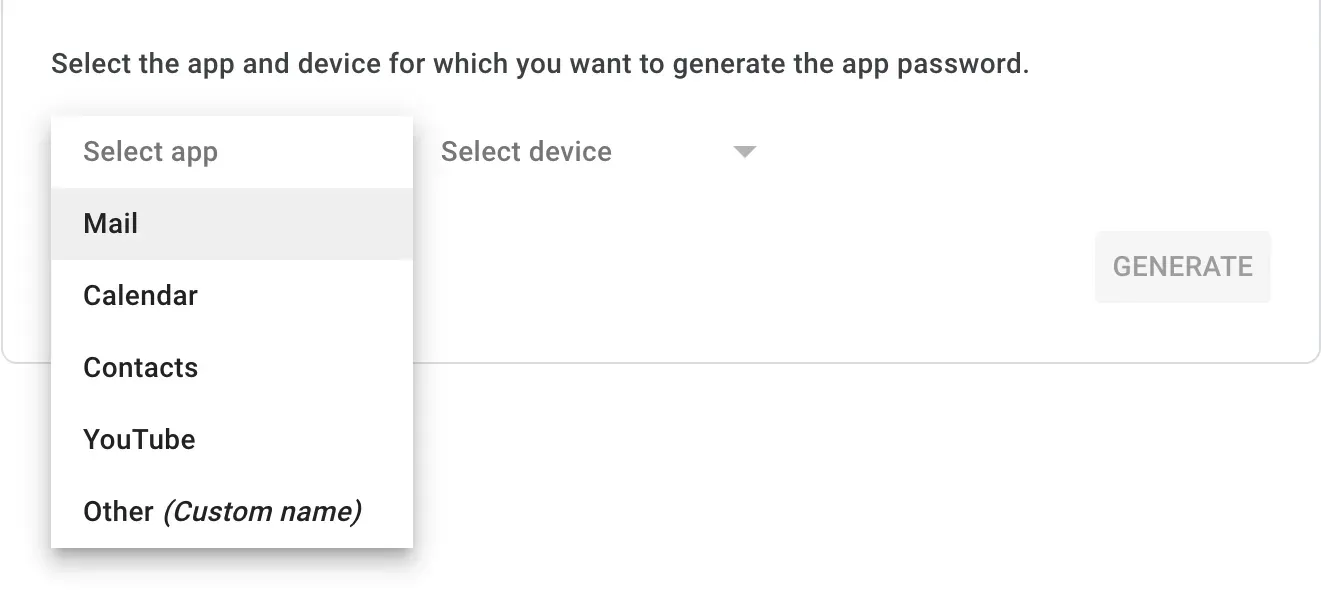
On that page, you will have 2 drop-down lists. One will be named 'Select app,' and the other will be 'Select device.'
In the first dropdown, select 'Mail'.
And in the second dropdown, select the 'Other (Custom name)' option. Next, click on the 'Generate' button. That will ask you for a name. In there, give a memorable name.
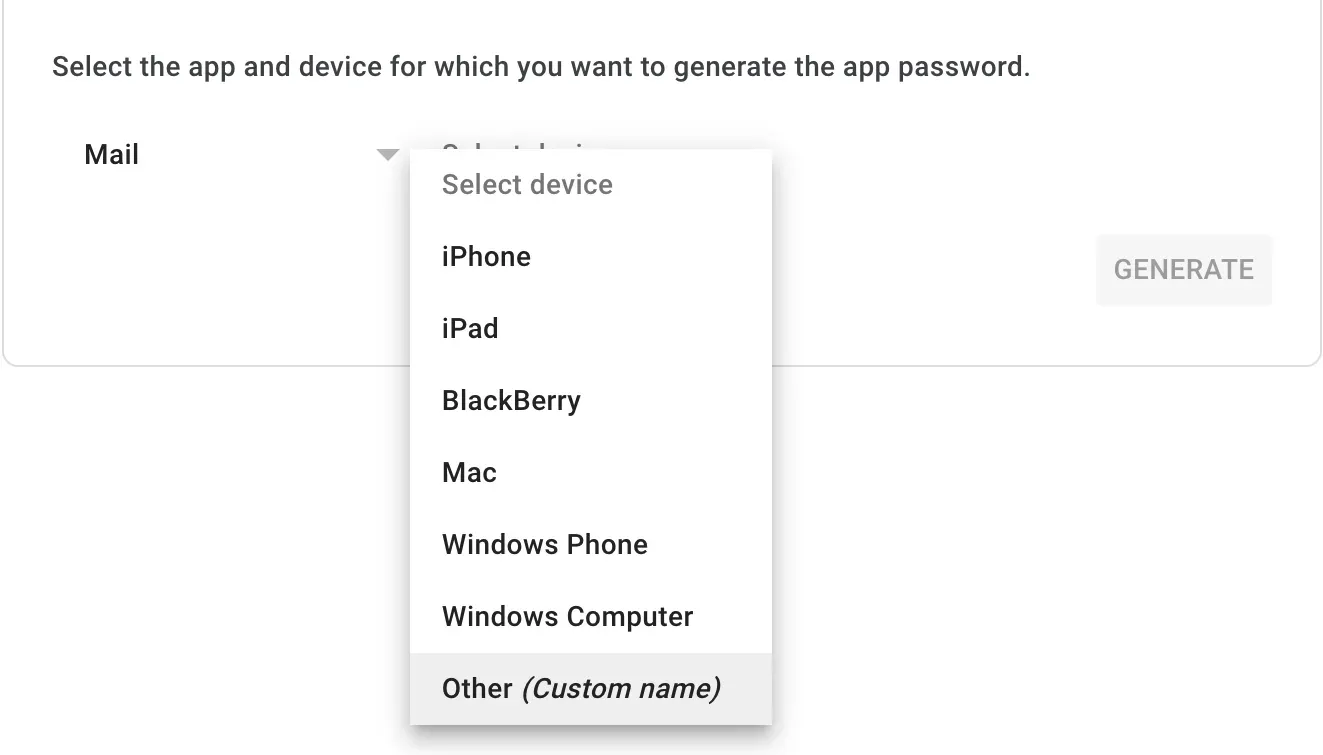
I used the name 'sendmail (Ubuntu)', and I'd recommend something similarly memorable.
Once a name is given, you will be presented with a 12-character alpha-numeric string. This is your application specific password. Please note it down, but do not share it with anyone else.
Here is a demonstration of what an application specific password looks like.
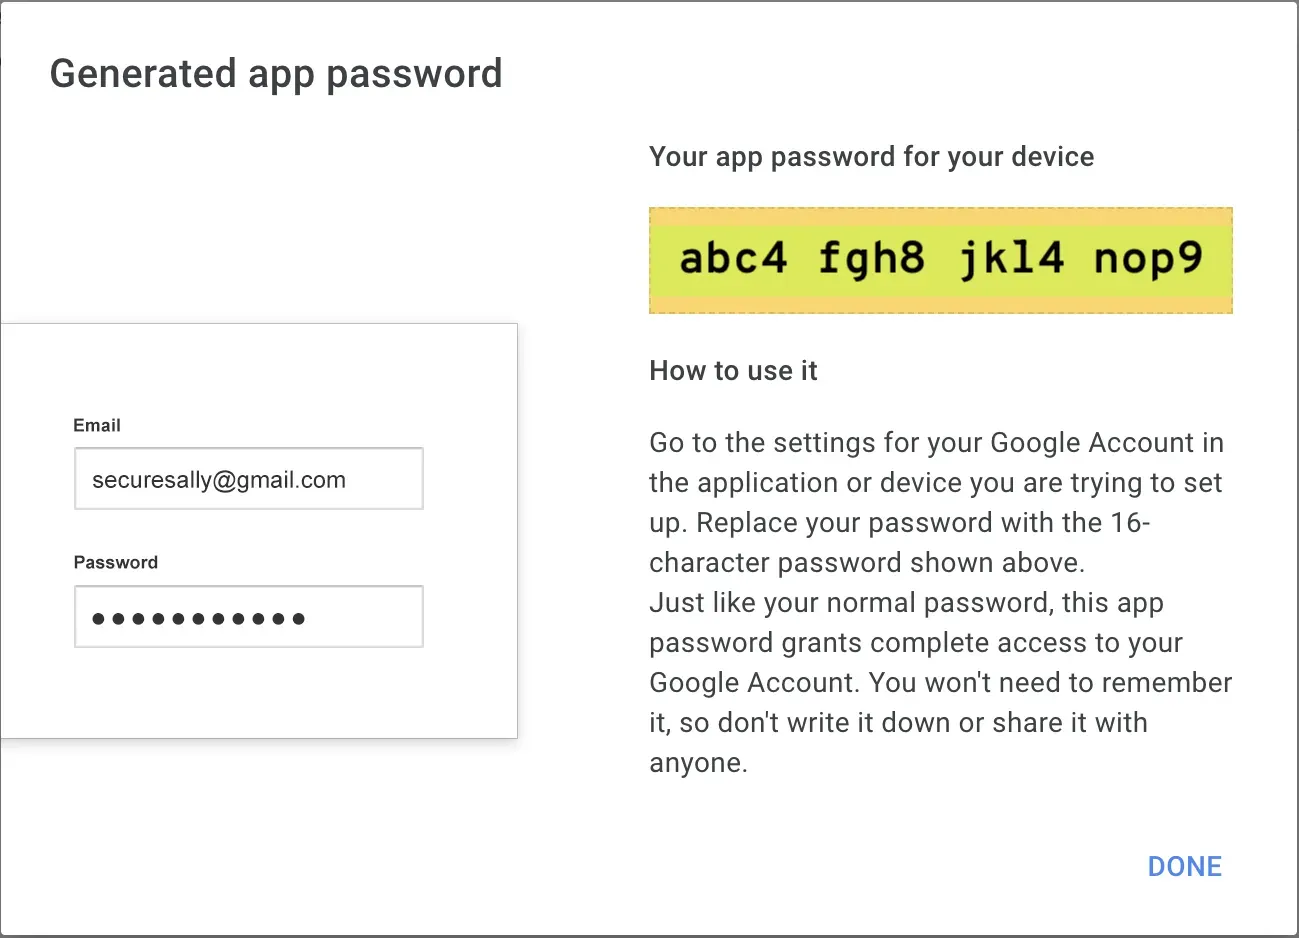
Please make a note of this: There are no spaces in this password. You should interpret this as abc4fgh8jkl4nop9.
Now that you have obtained an app-specific password from your e-mail provider, it is time to set up sSMTP and then send an e-mail.
Step 2: Setup sSMTP
Before you send an e-mail, a few things need to be done first. That includes installing necessary packages and setting up authentication.
To set up authentication, you need something that communicates using the Simple Mail Transfer Protocol (SMTP). We also need a mail client. The mail client is packaged in the mailutils package, and the SMTP handler is ssmtp. Install these using the following command:
sudo apt install mailutils ssmtpThis will install all the necessary mail-related utilities like mail, frm, messages, etc.
Once installed, you need to set up SMTP on our Ubuntu machine.
Do so by editing the /etc/ssmtp/ssmtp.conf file. I recommend editing using the sudoedit command like this:
sudoedit /etc/ssmtp/ssmtp.confBelow are the necessary modifications you must make to the ssmtp.conf file:
Hostname=<e-mail>@<domain>		# modify this

AuthUser=<e-mail>@<domain>		# modify this
AuthPass=<password>			# modify this
AuthMethod=LOGIN

mailhub=<domain>:<port>			# modify this

FromLineOverride=YES

UseTLS=YES
UseSTARTTLS=NO
Please modify all the fields that have the modify this comment to their right.
Before you move any further, let us understand the meaning of each field.
AuthUser: This is the field where you enter your e-mail address. If, for example, my e-mail address is[email protected], I would enter this address in theAuthUserfield.AuthPass: Remember the 12-character long alphanumeric 'app specific password' that we generated? That goes here. In the demonstration picture above, the password shown isabc4fgh8jkl4nop9(there are no spaces), and that is what I will be using.AuthMethod: This describes the method of authentication. It's best to set the value asLOGINas this is expected to work with a variety of e-mail providers, including Google, Yahoo, etc.Hostname: This is similar toAuthUser, so add your full e-mail ID here as well.mailhub: This field indicates where the mail goes. If you are using Google's e-mail services, we assume that this goes to Google's e-mail server. In that case, this should besmtp.gmail.com:465. If you are not using Google as your e-mail service provider, please consult the documentation of your e-mail provider. SMTP configuration: Google, Outlook, Yahoo, iCloud/Apple, Zoho Mail. If your e-mail provider is not covered here, you can simply query your search engine for "<e-mail provider> smtp configuration".FromLineOverride: This field specifies if you are allowed to override the 'From header' of an e-mail.UseTLS: This uses the TLS protocol to wrap the SMTP contents, enabling you send encrypted e-mail. It is recommended that you specify the value of this field as "YES".UseSTARTTLS: This specifies if the STARTTLS should be used or not. Using the STARTTLS protocol is not advised. Please specify the field value as "NO".
With all that hopefully cleared up, let's move to sending e-mails from the command line.
Step 3: Sending an e-mail from the command line
On Ubuntu, there are several command line utilities that you can use to send an e-mail. Let's take a look at a few of these command line utilities.
Method 1: Sending emails using the ssmtp utility
The ssmtp utility is not only used to set up e-mail authentication but as you will see, it is also used to send e-mails from the command line.
Below is the syntax for the ssmtp command:
ssmtp [email protected]Yes, the syntax is that simple! Once you run this command, you will enter an interactive mode where you are expected to type at least the Subject and Body.
Let's try to send an e-mail to [email protected] and see how to interactively send an e-mail using the ssmtp command.
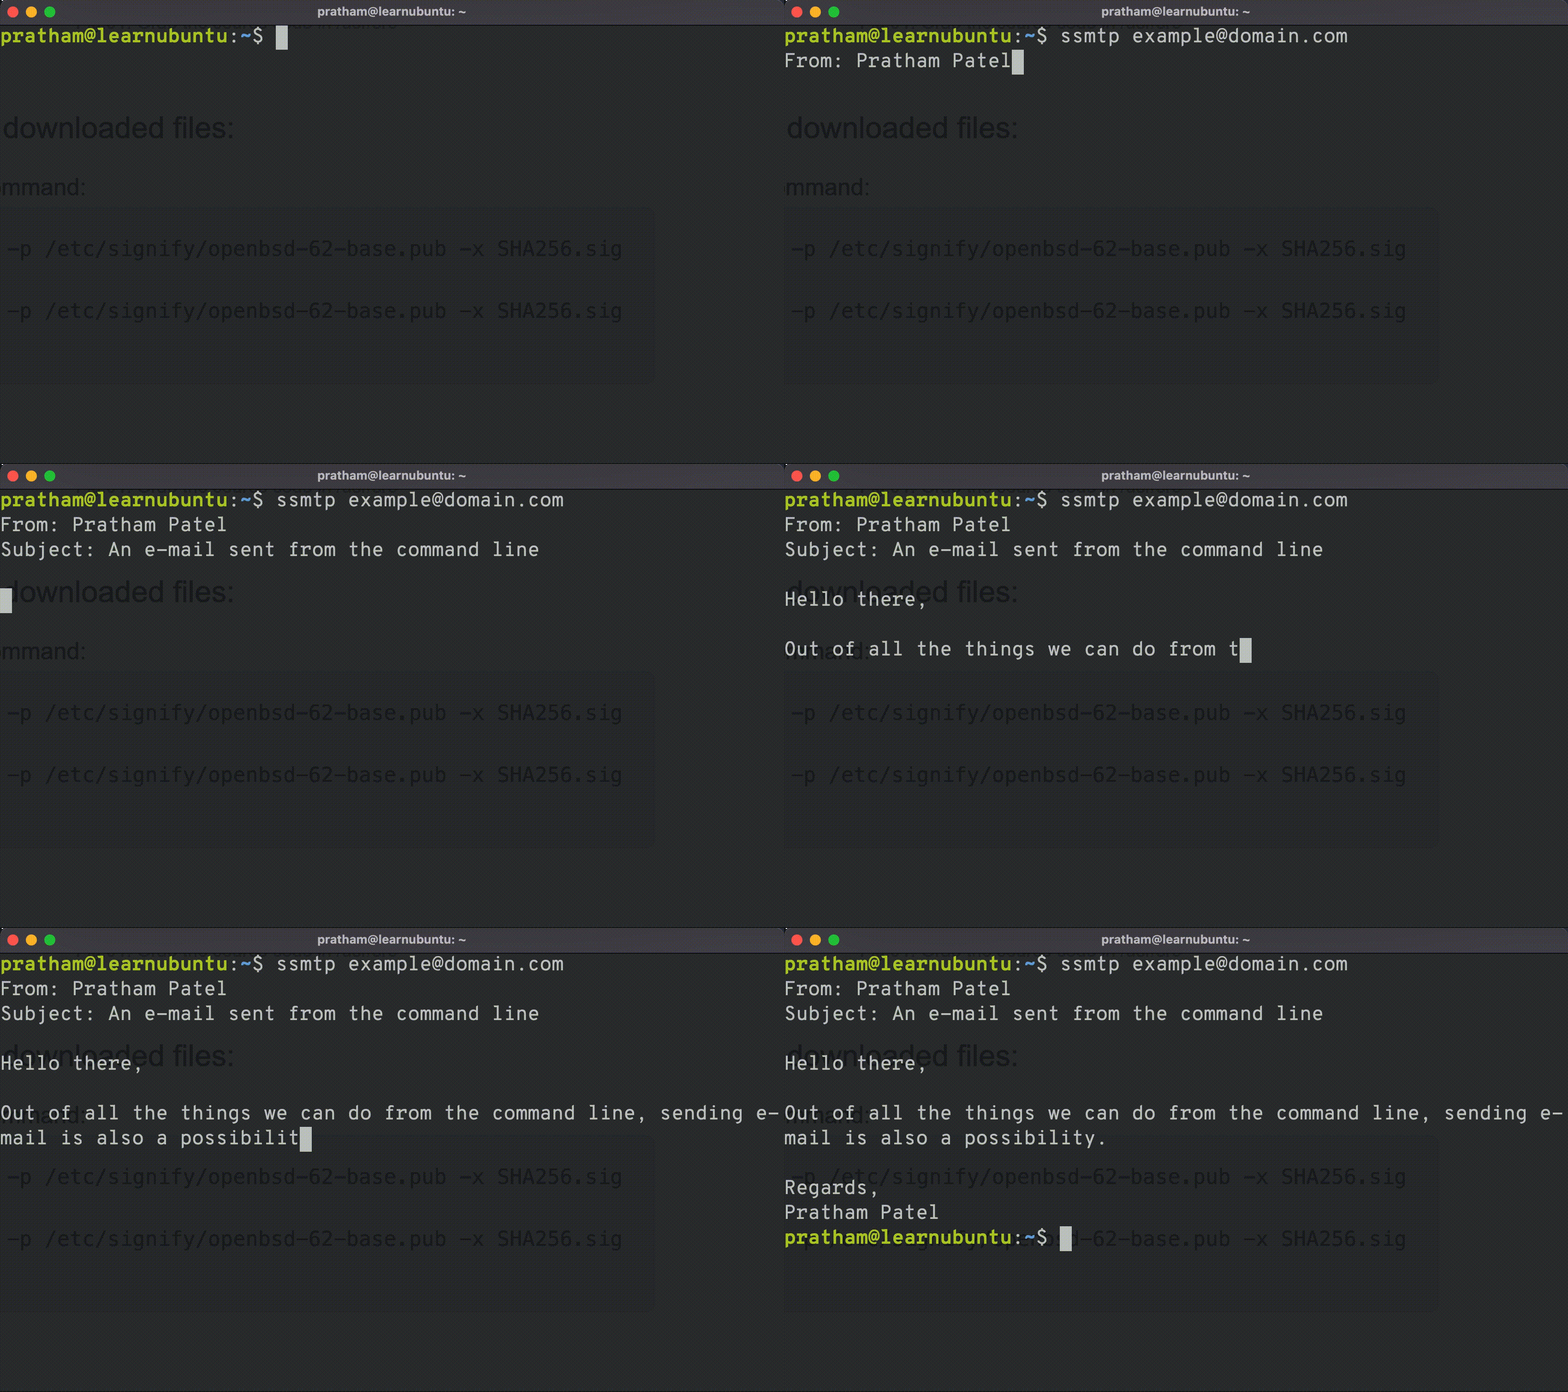
Once you type out ssmtp [email protected] in the terminal, you will be dropped into an interactive session. Meaning, that pressing the Enter key will not run the command until you press a special key.
When you enter the interactive session, type out fields like 'From:', 'Cc:', 'Bcc:' and 'Subject:' (whichever are required).
For the Body field, press Enter twice and then you can type your message. Once you finish writing the message, press Enter so that you are on a new line and then press the ^d (Ctrl + d) key combination.
The ^d is an escape key and it tells sSMTP that the e-mail is written and should be sent now.
After pressing ^d, an e-mail will be sent as per the contents of the fields that you have specified.
Sending emails non-interactively
One can easily make mistakes while typing in the interactive mode, so instead, I will show you a different way. Create a text file with necessary fields populated. Below is the format:
To:
From:
Cc:
Bcc:
Subject:
I will name my file email-contents.txt, and below are the contents I will use. Not much is needed for my use case.
From: Pratham Patel
Subject: Sent from the command line

Hi Abhishek,

I'm working on an article about sending an e-mail from the command line. This e-mail was used to send

Regards,
Pratham Patel
Note: Since I will be using the recipient's e-mail address when running the ssmtp, I have not used the 'To:' field.
Once you have a text file with necessary fields, use the following syntax:
ssmtp [email protected] < your_text_file.txtThis way, instead of switching to interactive mode, sSMTP will use the input text file as the e-mail content and sent it appropriately. Below is how I would run this command:
ssmtp [email protected] < email-contents.txtDoing so will send an e-mail to Abhishek from me.
Method 2: Sending emails using the mail command
The mail command is an alternative to the ssmtp utility. Like the sSMTP utility, you can use the mail command to send an e-mail either interactively or with a pre-defined message with the help of a text file.
The mail command is already included in the mailutils package on Ubuntu. So, if you installed it, no additional installation is not necessary. But you are required to setup e-mail authentication (using the sSMTP utility).
The syntax of the mail command is quite similar to sSMTP and it is as follows:
mail [email protected]Doing so, like sSMTP, will drop you in the interactive mode. The difference being, fields like 'Subject:' and 'Cc:' will be given to you to be filled. You can leave them empty if you like.
Let's try sending Abhishek another e-mail using the mail command.
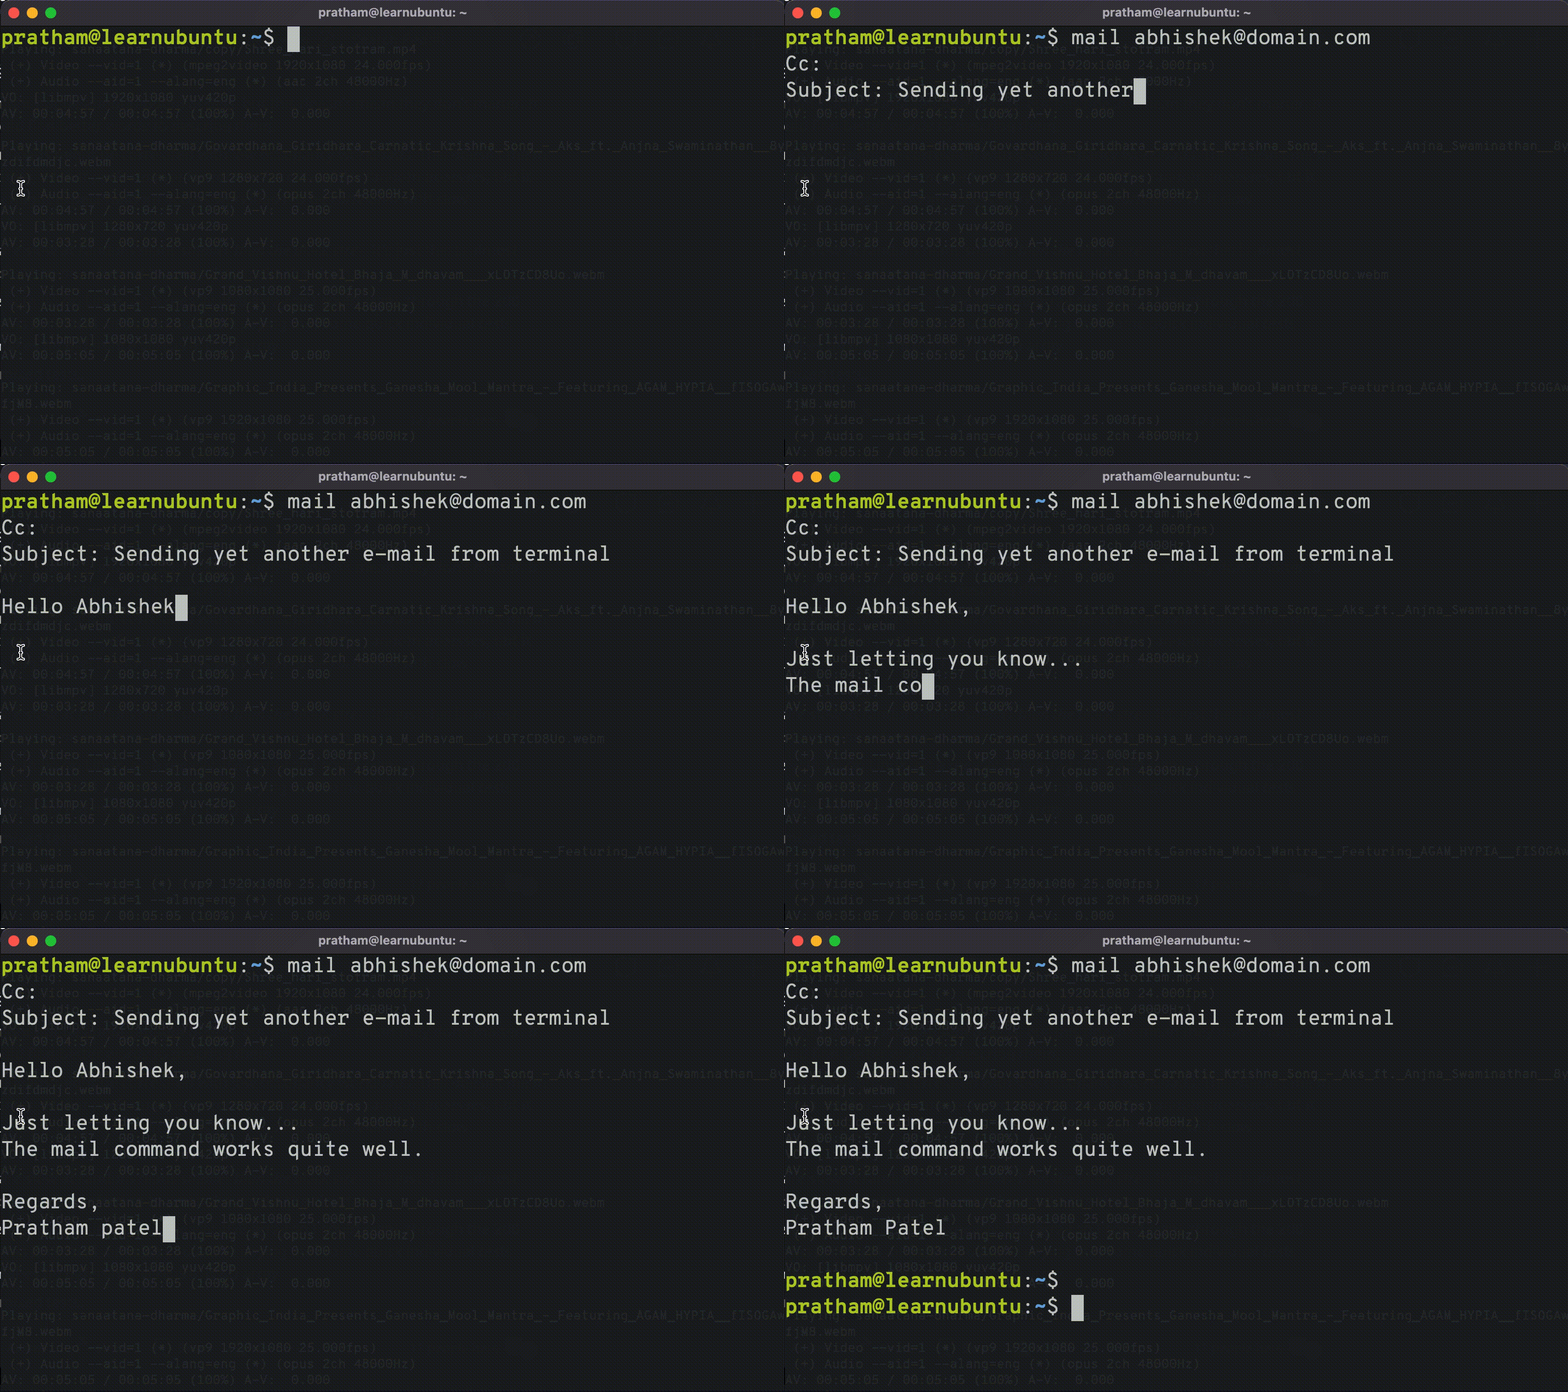
Like the sSMTP utility, you can type as long as you want. Once you are done, on a new line, press the ^d (Ctrl + d) key combination to specify that you are done writing the e-mail it should be sent now.
Non-interactive mode in mail command
As I said earlier, the mail command, like sSMTP, can use a text file to populate necessary fields. The content format of the text file does not change. So, use the format that I have specified above.
The syntax to send an e-mail using a text file is a following:
mail [email protected] < your_text_file.txtSo, to send an e-mail to Abhishek, I would use the mail command like so:
$ mail [email protected] < email-contents.txtBonus: Attachments
One advantage of using the mail command over the ssmtp utility is that you get the ability to send attachments.
To attach a file as an e-mail attachment, use the following syntax:
mail [email protected] -a FILEReplace 'FILE' with whatever file you wish to attach, and the mail command will attach it as an attachment when you send the e-mail.
Conclusion
This article covers how you can send e-mails from the command line. We go through the setup of setting e-mail authentication and also cover how you can use the ssmtp and mail commands to send an e-mail. As a bonus, attaching files as attachments is also covered.
I know this is not a simple tutorial and needs some manual effort. But, the good thing is that it teaches you several things along the way.
And of course, I expect that you may encounter issues and if that's the case, please let me know in the comments.