How to Properly Uninstall mysql from Ubuntu
Want to remove MySQL from Ubuntu? Learn how to take backup of your database and then remove it in this tutorial.

I hope you have a good enough reason to remove MySQL from your Ubuntu system.
You had installed MySQL earlier but you don't need it all or you just want to use something easy to configure, use and maintain like Sqlite3.
Removing mysql is not difficult but you should take backup of the database if you plan to switch to PostgreSQL or MariaDB or some other database system.
In this tutorial, I will walk you through:
- Takintg backup of existing database
- Removing MySQL
Let's start with the first one.
How to backup MySQL database in Ubuntu
If you have sensitive databases, it is necessary for you to create a backup as you may not want to lose the precious database you created in past.
To create a backup for a single database table, execute the mysqldump command in the following syntax:
mysqldump -u DB_Username -p Database_name | gzip > Databse.sql.gzFor example, here, I created a backup for movies database owned by the root user and created a compressed file using the gzip command:
mysqldump -u root -p movies | gzip > movies.sql.gz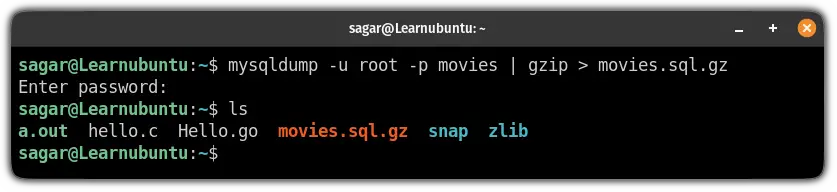
But if you want to create a backup for the entire MySQL database, execute mysqldump command in the following manner:
mysqldump -u root -p --all-databases | gzip > all-databases.sql.gz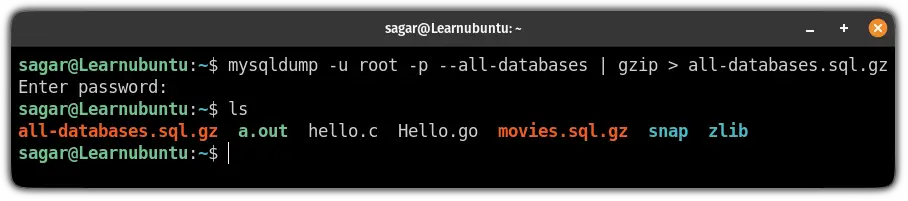
Once you have created a backup for your database, you can uninstall MySQL without hesitation.
How to uninstall MySQL from Ubuntu
You can easily remove MySQL from your Ubuntu system using the following command:
sudo apt remove --auto-remove mysql-serverUsing apt remove won't remove the configuration files so if you want to remove them use apt purge:
sudo apt purge --auto-remove mysql-serverHere, the --auto-remove flag will remove all the unnecessary dependencies that were installed with MySQL and are no longer needed.
Next, you will have to remove some files that were not removed during the installation process (even if you use the purge).
To list files that still exist on your system, use the following commands:
ls /etc/mysql
sudo ls /var/lib/mysql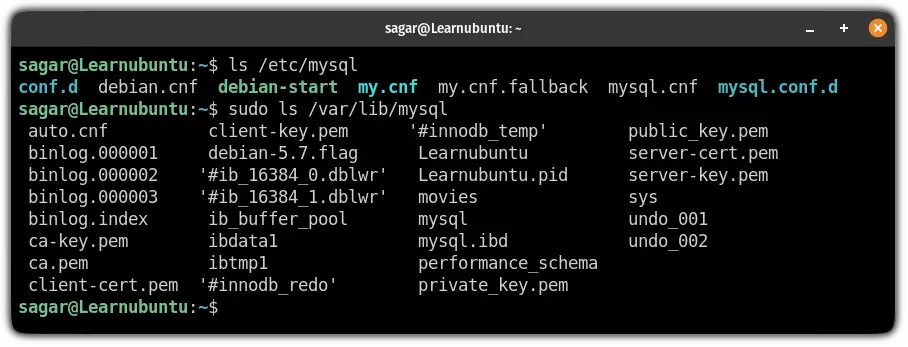
The /etc/mysql directory contains configuration files whereas /var/lib/mysql contains security keys.
And to remove them, use the following command:
sudo rm -r /etc/mysql /var/lib/mysql If you have enabled logs for MySQL and want to remove them, use the following command:
sudo rm -r /var/log/mysqlThat's all it took to remove MySQL from Ubuntu. Was pretty quick. Isn't it?
Want a lightweight and easy database solution?
If you are looking for an easy and lightweight relational database management system, you can try Sqlite3:
I hope this tutorial has solved the queries you had earlier.
And if you face errors while removing MySQL, let me know in the comments.

A software engineer who loves to tinker with hardware till it gets crashed. While reviving my crashed system, you can find me reading literature, manga, or watering my plants.