

FTP (File Transfer Protocol) is known for being one of the easiest ways to transfer files over the network.
But being developed in the 1970s, you don't get any option for encryption and this is the reason why you'd have to perform additional steps to secure it.
And in this tutorial, I will show you how you can add SSL certificates for additional security.
How to install and setup FTP server on Ubuntu
In this tutorial, I will walk you through the following:
- Installation of vsftpd
- Configuring firewall rules for FTP
- Restrict FTP access
- Configuring vsftpd
- Adding SSL certificates for security
- Using Filezilla to test the connection
So let's start with the installation.
How to install vsftpd in Ubuntu
To install vsftpd in your system, all you have to do is execute the following command:
sudo apt update && sudo apt install vsftpdOnce you're done with the installation, it is recommended to copy the default configuration file so you can always switch back to the defaults.
And to do so, you can use the cp command in the following manner:
sudo cp /etc/vsftpd.conf /etc/vsftpd.conf.backupThat's all it takes for the installation. Now, let's have a look at the firewall part.
How to allow FTP to pass through the firewall in Ubuntu
Before you proceed, I would recommend you check the status of ufw firewall, and if it is inactive, you can enable it using the following:
sudo ufw enableOnce done, use the given commands one by one to allow ports or services on ufw firewall:
sudo ufw allow OpenSSH
sudo ufw allow 20/tcp
sudo ufw allow 21/tcp
sudo ufw allow 990/tcp
sudo ufw allow 40000:50000/tcp
In case, if you are wondering why you have to allow so many ports, here's a brief explanation:
OpenSSHwill allow you to connect through SSH.20/tcpand21/tcpare used for the FTP traffic.- Port no
990will come to play when you'd enable the SSL certificates for better security. - Port no
40000to50000are reserved for the passive ports and will be configured through the config file.
Once done, you can check the status of ufw firewall to list the rules:
sudo ufw status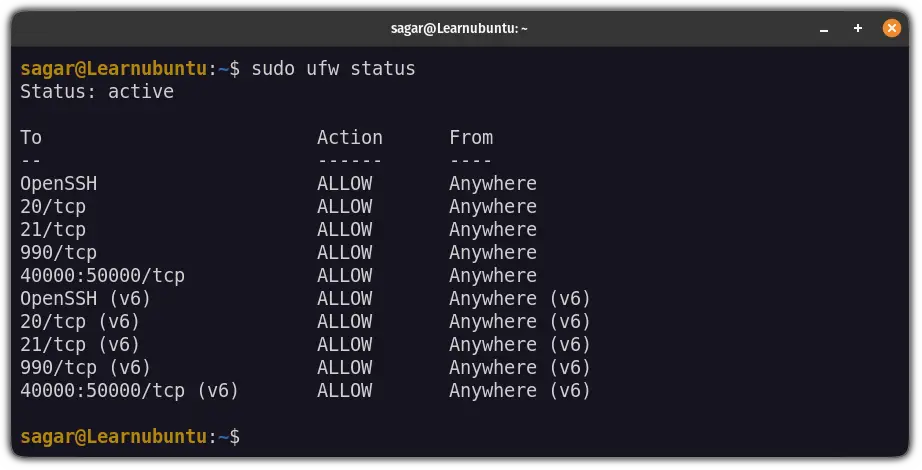
How to restrict FTP access for security
In this section, I will explain how you can create a new user and directory that will be utilized for the FTP.
And will also explain how you can limit access for better security.
So let's start with creating a new user in Ubuntu. Here, I went with a username ss but you can use anything else:
sudo adduser ssIt will ask you to enter a password for the user and other information like full name etc:

abhi username, you'd have to enter abhi whenever I have used [FTP-username].Next, let's create a new directory for the recently created user:
sudo mkdir /home/[FTP-username]/ftpMake sure you enter the username that you created recently in place of [username].
Now, let's change the ownership in such a way that the user can not make any changes to the directory.
And for that purpose, I will change ownership to the user nobody and group nogroup which are used in Unix-like systems to restrict user access:
sudo chown nobody:nogroup /home/[FTP-username]/ftpUsing the above command, you can be assured that the user you created for FTP can not access anything outside the directory.
Now, remove the write permissions of the recently created directory:
sudo chmod a-w /home/[FTP-username]/ftpOnce done, let's create a directory where you can store files:
sudo mkdir /home/[FTP-username]/ftp/filesAnd change the ownership of the files directory to the user you created for FTP:
sudo chown [FTP-username]:[FTP-username] /home/[FTP-username]/ftp/filesAs I went with the ss username, my command would look like this:
sudo chown ss:ss /home/ss/ftp/filesFinally, create a test file which will, later on, be used when you'd test the whole configuration:
echo "vsftpd sample file" | sudo tee /home/[FTP-username]/ftp/files/sample.txtThat's it! You are done with the user and directory creation with restricted access.
How to configure vsftpd in Ubuntu
The vsftpd config file is located at /etc/vsftpd.conf so you can use any of your preferred text editors to make changes.
But here, I will be using nano:
sudo nano /etc/vsftpd.confOnce you get into the file, go to the end of the file in the nano text editor using Alt + / and paste the following:
write_enable=YES
chroot_local_user=YES
user_sub_token=$USER local_root=/home/$USER/ftp
pasv_min_port=40000 pasv_max_port=50000
userlist_enable=YES userlist_file=/etc/vsftpd.userlist userlist_deny=NO
Save changes and exit from the nano text editor.
Now let me explain the lines that I asked you to paste in the config file.
write_enable=YES: Allows FTP users to send files and make changes to the file system (if they are configured to do so).user_sub_token=$USER local_root=/home/$USER/ftp: It will allow you to have the same directory isolation when you'd have more than one user.pasv_min_port=40000 pasv_max_port=50000: It will ensure that you'd have various ports available to access multiple connections.userlist_enable=YES userlist_file=/etc/vsftpd.userlist userlist_deny=NO: The purpose of these derivatives is to restrict FTP access to only the users listed in the userlist file.
Once you have saved the changes, you'd have to add the user to the userlist file using the following command:
echo "[FTP-username]" | sudo tee -a /etc/vsftpd.userlistFor me, the username was ss so, my command would look like this:
echo "ss" | sudo tee -a /etc/vsftpd.userlist
And finally, restart the service to take effect from the changes you've just made to the config file:
sudo systemctl restart vsftpdHow to secure FTP using SSL certificates
As I mentioned earlier, by default, FTP does not bring the encryption feature which itself is a vulnerability.
So in this section, I will show you how you can add SSL certificates to make FTP secure.
First, use the following command to add certificates:
sudo openssl req -x509 -nodes -days 365 -newkey rsa:2048 -keyout /etc/ssl/private/vsftpd.pem -out /etc/ssl/private/vsftpd.pemIt will ask you certain questions and you may skip them if you want to:
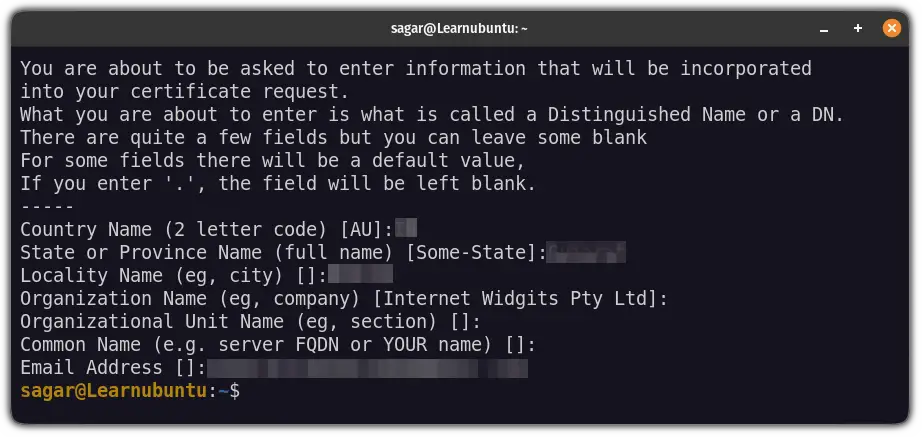
The certificates will remain valid for 365 days and have a 2048-bit private RSA key.
Now, let's add a path to the SSL certifications in the config file.
First, open the config file using the following:
sudo nano /etc/vsftpd.confAnd look for the following lines:
rsa_cert_file=/etc/ssl/certs/ssl-cert-snakeoil.pem
rsa_private_key_file=/etc/ssl/private/ssl-cert-snakeoil.key
Now, change them in the following manner:
rsa_cert_file=/etc/ssl/private/vsftpd.pem
rsa_private_key_file=/etc/ssl/private/vsftpd.pem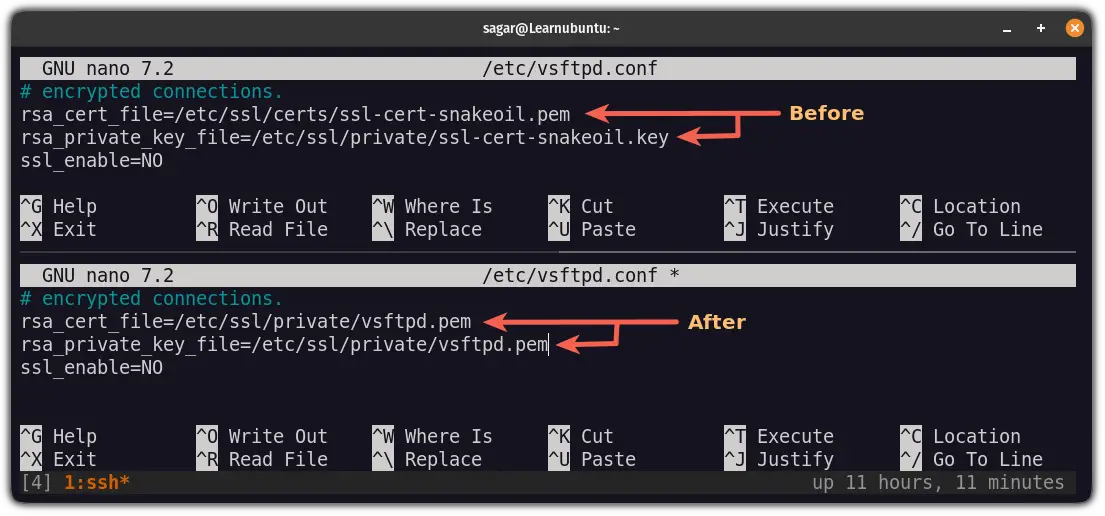
In the next line, change the ssl_enable=NO to ssl_enable=YES:
ssl_enable=YES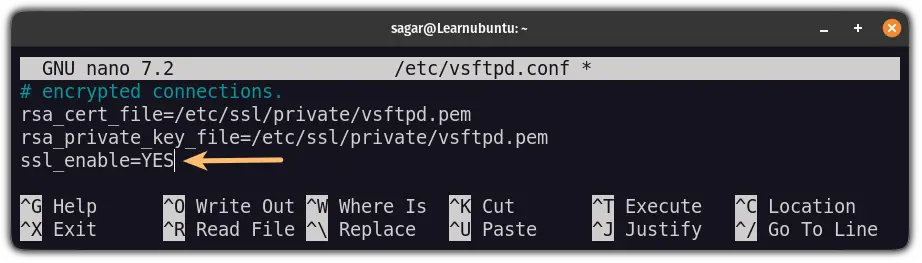
Next, go to the end of the file and paste the following lines:
#Block anonymous connections
allow_anon_ssl=NO
force_local_data_ssl=YES
force_local_logins_ssl=YES

#Configure server to use TLS
ssl_tlsv1=YES
ssl_sslv2=NO
ssl_sslv3=NO

#Disable reuse
require_ssl_reuse=NO

#Make cipher lenght high
ssl_ciphers=HIGH
By adding the above lines to your config file, you should expect the following effect:
- Ban anonymous connections over SSL
- Sever will use TSL (Transport Layer Security)
- Disable SSL reuse to prevent crashes
- Use cipher suits that are equal to or higher than 128 bits
Once done, save changes and exit from the text editor.
To take effect from the changes, restart the vsftpd service:
sudo systemctl restart vsftpdSubscribe


