Using du Command in Ubuntu
Learn how to use the du command to check directory size in Ubuntu command line.

The ls command may give you the size of a file but it won't show the directory size.
The du (disk usage) command is used to check the disk space utilization of a specific directory and when combined with multiple options, it can do wonders.
And in this tutorial, I will walk you through multiple examples of the du command for determining directory sizes.
How to use the du command in Ubuntu
To use the du command, you'd have to follow a simple command syntax:
du [OPTION] /path/to/dirHere,
[OPTION]: Provides a way to manipulate the default behavior of the du command./path/to/dir: This is where you have to provide the path to the directory which you want to investigate.
But when executed without any additional options, the output is not in the most human-readable manner.
For example, here, I used the du command over the Test directory without any additional options:

1. Get output in the human-readable form
To get the output in the human-readable form, you can use the -h flag as shown:
du -h /path/to/targetFor example, here, I used the du command over the Test directory situated in my home directory:

2. Get the total size of the target directory
If you just want to find out the total size of the targeted directory, you'd have to use the -s flag with the -h as shown:
du -sh /path/to/target
3. Get output in MB, GB, or KB
When you use the -h flag to enable human-readable form, you'll mostly get output in Gigabytes but you may want to change this behavior.
- To get output in Kilobytes:
du -BK /path/to/target
- To get output in Megabytes:
du -BM /path/to/target
- To get output in Gigabytes:
du -BG /path/to/target
4. Specify how deep to look (important)
By default, the du command works recursively which is fine for most cases. But if you want you can change the depth of how deep the du command should look.
To do so, you'd have to use the du command in the following manner:
du -h --max-depth=<depth_in_numbers> /path/to/targetFor example, here, I went with a max depth of 2 compared to the default behavior:
du -h --max-depth=2 ~/Test
du -h --max-depth=1 .5. Exclude certain file types
While using the du command, you may want to exclude certain types of files such as text, MP3, scripts, etc.
And in that case, you can use the --eclude flag as shown:
du -h --exclude="*.file-extension" /path/to/targetFor example, here, I excluded the text files with the size difference I noticed to the default execution:

6. Find the last modification time
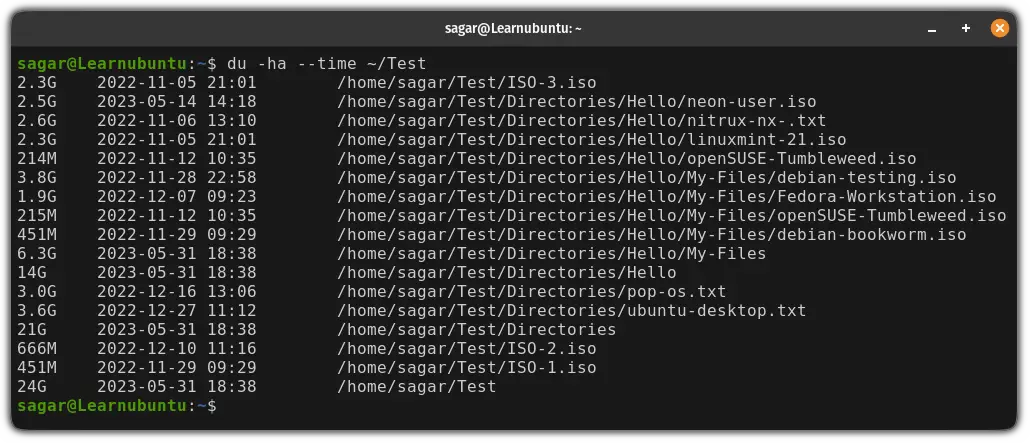
If you want to find out the last medication time, the du can do that for you. This can easily be achieved using the --time flag as shown:
du -ha --time /path/to/target
Here, the -a flag was used to list hidden files.
Bonus: A modern alternative to the du command
What if I tell you that you can achieve the same results with better visuals and an interactive way of checking the directory size?
It is called ncdu and it can be installed using the following:
sudo apt install ncduOnce done, it can be used the same way as you used the du:

More on disk space
The du command gives the directory size but not necessarily the entire disk space for all the partitions. Here's how to list disk partitions with their sizes.

If you are suffering from low storage, here's how you can remove the unnecessary files and increase the file storage:

I hope you will find this helpful.
