Install and Setup Kubernetes on Ubuntu
Here's the step by step guide for properly installing Kubernetes on Ubuntu. You'll also learn to do a basic master-worker set up.

Installing Kubernetes in Ubuntu has always been a complex task, requiring you to go through multiple steps on two different systems (for master and slave nodes).
So in this tutorial, I will walk you through step-by-step how you can install Kubernetes including setup steps which include:
- Disable swap memory
- Setting up hostname and static IP
- Installation of Docker and Kubernetes packages
- Setting up master and node with configuration
But before that, let's have a look at the prerequisites (this time, it is important).
Prerequisites of installing Kubernetes on Ubuntu
You will need two Ubuntu systems, physical or VMs to install Kubernetes. One for the master node and one for the node (worker).
Sure, you can have more than 2 VMs if you want to have more nodes.
- For the master node, make sure you have at least 2 cores and 2GB of RAM.
- For the node, allocate a minimum of 2GB of RAM and one core.
- Also, make sure you have sudo privileges on both servers.
Now, let's start the guide.
How to install Kubernetes in Ubuntu
As I mentioned earlier, there are steps that need to be performed on both servers whereas some are specific to the master and some are for the node.
To make things easy, this guide is further divided into 3 parts:
- Steps that need to be performed on both servers (master and node)
- Steps that are specific to the master server
- Steps that are specific to the node server
I will be using two virtual machines Ubuntu servers learnubuntu-1 and learnubuntu-2 (hostnames of the VMs) to demonstrate this guide.
So let's start with the steps that need to be performed on both nodes.


Steps for both servers (master and node)
As you can guess, this section will include steps that you have to perform on both servers (master and node).
This section will include the following:
- Disabling swap
- Adding necessary kernel modules
- Updating hostname and enabling static IP address
- Install Docker
- Install kubeadm, kubelet, and kubectl packages
Again, make sure to perform all the steps shown in both nodes.
Step 1: Disable swap in Ubuntu
Ubuntu uses a swap file, a modern and easy way to manage swap in Linux which allows you to make changes without risking the existing partition scheme.
So here, I will only be showing you how you can disable and remove the swap file.
First, verify if you have swap file or not using the following:
cat /proc/swaps
If you get similar output, it indicates your system is using the swap file.
First, disable the swapfile using the following command:
sudo swapoff -aNext, remove the swapfile by using the rm command in the following manner:
sudo rm /swap.imgswap.img so make sure you enter the current name with the rm command.But it will only work temporarily and once you reboot, it will recreate the swapfile and it will come into action.
To stop this behavior, you have to make changes in the /etc/fstab file.
First, open the /etc/fstab file using the following command:
sudo nano /etc/fstabFind the line related to the swap file and remove it as shown here:

Finally, save changes and exit from the nano text editor.
To take effect from the changes you've made, reboot your system.
That's it!
Make sure you repeat the same steps for the other VM/node.
Step 2: Add necessary kernel modules
You need to add overlay and br_netfilter modules as containers rely on these modules for their key functionality including storage and network capabilities.
First, open the containerd.conf file using the following:
sudo nano /etc/modules-load.d/containerd.confNow, paste the following lines to the file:
overlay
br_netfilter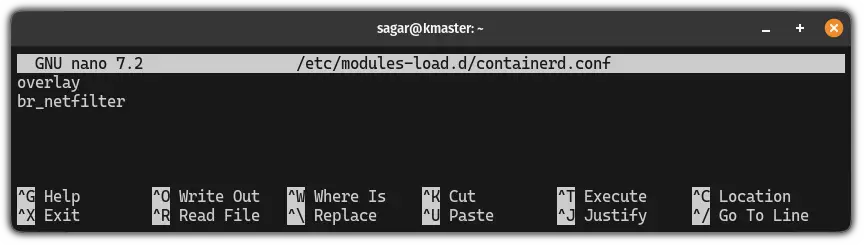
But to make them work, you'll need to restart your system. To avoid that, you can use the modprobe command to add them imminently:
sudo modprobe overlay && sudo modprobe br_netfilterStep 3: Change the hostname
You can change the hostname of both servers (one by one) using the hostnamectl command.
I would recommend using the hostname kmaster for the master server and knode for the node server.
Use the following command one by one on each server to change the hostname.
For example, if you want to use the kmaster for the master server, use the following:
sudo hostnamectl set-hostname kmasterNow, log in to the node server and use the following command:
sudo hostnamectl set-hostname knodeThat's it! Now, let's have a look at setting up a static hostname.
Step 4: Setup static IP address
If you're curious why you need to set static IP address, the reason is pretty simple.
You have to enter the IP address of the master and node server in each other's configuration file by which they'll be able to connect to each other.
And if you have a dynamic IP address, it will be changed every time you reboot your system.
First, know your current IP address using the following command:
hostname -I
Next, identify the interface using the following command:
ip link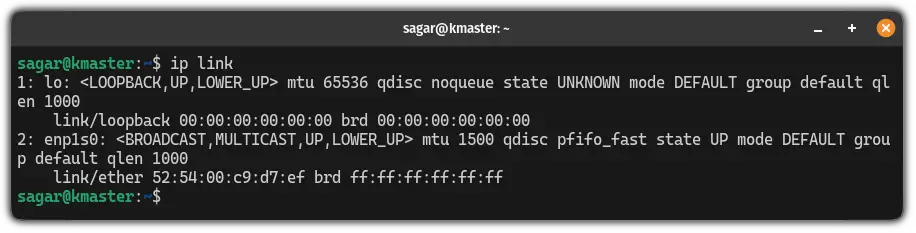
The above screenshot suggests that my interface is enp1s0.
Next, you need to verify if cloud-init is present in your system, and if it does, then you need to disable it so you can use the static IP address.
To verify if the cloud-init is present use the following:
apt-cache pkgnames | grep cloud-init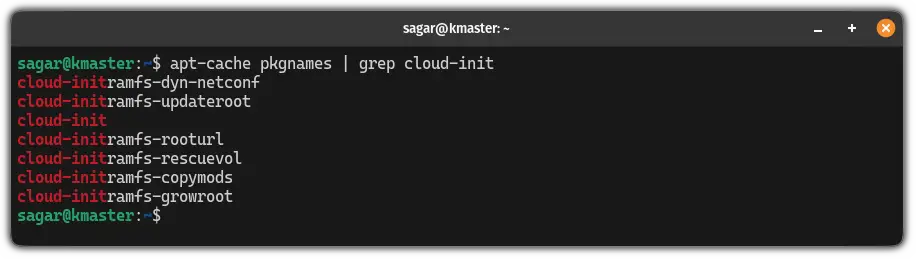
If you got a similar output as I did it simply means you have cloud-init enabled in your system.
To disable it, you need to create a new file inside of /etc/cloud/cloud.cfg.d directory. In this case, the filename does not matter, just make sure to have an .cfg extension.
For example, here, I created 99-disable-cloud-init.cfg file:
sudo nano /etc/cloud/cloud.cfg.d/99-disable-cloud-init.cfgThe above command will create and open the file. Then, simply paste the following lines:
network: {config: disabled}Once done, save changes and exit from the editor.
Here comes the most important step where you have to make some changes in the file present inside the /etc/netplan directory.
First, change your directory to /etc/netplan using the cd command:
cd /etc/netplanHere use the grep command in the following manner:
grep -iH <interface_name> *.*In my case, the name of the interface is enp1s0 so I will be using the following:
grep -iH enp1s0 *.*
You can use the cat command to list the contents of the file:
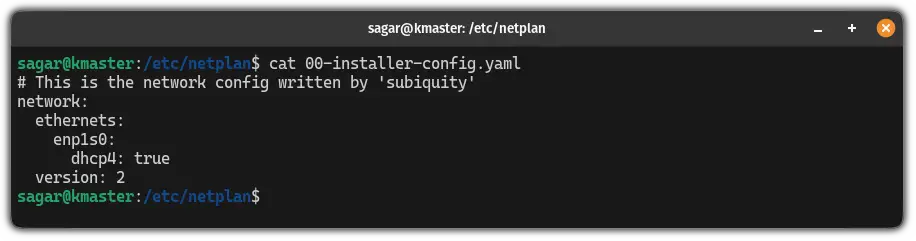
Here, you have to make 3 changes:
- Change
dhcp4: truetodhcp4: no. - Add a new field
addressesto specify the static IP address - Add a new filed
gateway4to specify the gateway - Create a new field
nameserversfor nameservers
To do so, first, open the file using the following command:
sudo nano 00-installer-config.yamlFor example, here's how it looks like when I set the static IP address to 192.168.122.100:
network:
  ethernets:
    enp1s0:
      dhcp4: no
      addresses:
        - 192.168.122.100/24
      gateway4: 192.168.122.1
      nameservers:
        addresses: [1.1.1.1, 1.0.0.1]
  version: 2
Once done, save changes exit from the nano text editor, and use the following command to active the changes you've made:
sudo netplan applyStep 5: Add hostnames and IP addresses to the hosts file
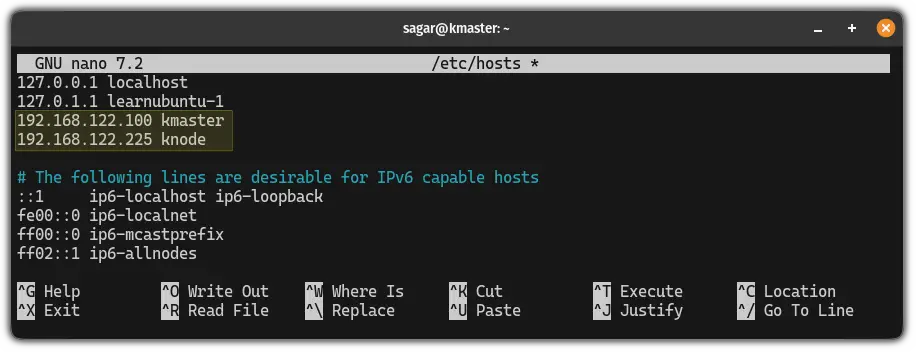
Once you have configured the hostname and the static IP address, it is time to reference them in the /etc/hosts file.
In simple terms, you need to enter the hostname and IP address in the /etc/hosts file of the master and node server.
First, open the hosts file using the following command:
sudo nano /etc/hostsNow, add the IP address of the master and node server as shown here:
I did and you should do the same for the node server:
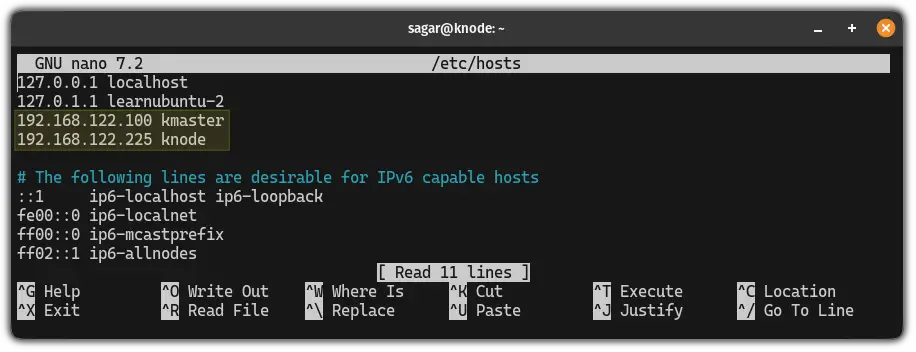
Once done, save changes and exit from the text editor.
Step 6: Install Docker
The reason why you need to install Docker is that the Docker images will be used to manage the containers in the cluster.
To install Docker in Ubuntu, all you have to do is execute the following command:
sudo apt update && sudo apt install docker.ioNext, add the current user to the Docker group:
sudo usermod -aG docker $USER Now, start the Docker service:
sudo systemctl start docker To start Docker automatically at the system startup, use the following:
sudo systemctl enable docker Step 7: Install kubeadm, kubectl, and kubelet
The kubeadm, kubectl, and kubelet are essential packages to make things work in Kubernetes. But before that, you have to configure the Kubernetes environment.
Configuring the Kubernetes environment simply means adding a Kubernetes repository to Ubuntu as you can not install Kubernetes from the Ubuntu repo.
First, install curl and apt-transport-https using the following:
sudo apt-get install -y apt-transport-https curlNext, add the GPG key to your system:
curl -s https://packages.cloud.google.com/apt/doc/apt-key.gpg | sudo apt-key add After that, use the following command to add the Kubernetes repository to your system:
sudo apt-add-repository "deb http://apt.kubernetes.io/ kubernetes-xenial main" Finally, use the following command to install kubeadm, kubectl, and kubelet:
sudo apt install kubeadm kubectl kubeletStep 8: Network configuration for Kubernetes
In this section, I will walk you through how you can add networking parameters for network and routing support for your Kubernetes clusters.
First, open the Kubernetes configuration file:
sudo nano /etc/sysctl.d/kubernetes.confAnd paste the following lines in the file:
net.bridge.bridge-nf-call-ip6tables = 1
net.bridge.bridge-nf-call-iptables = 1
net.ipv4.ip_forward = 1
Save changes and exit from the config file. Use the following command to reload the configuration file:
sudo sysctl --systemNow, let's break the shown lines:
net.bridge.bridge-nf-call-ip6tables = 1: enables IPv6 tables for bridge traffic.net.bridge.bridge-nf-call-iptables = 1: enables iptables rules for bridge traffic.net.ipv4.ip_forward = 1: enables IPv4 packet forwarding on the system.
Step 9: The Docker configuration
This is the last section where I will walk you through the configuration of Docker by which it will behave consistently on every cluster.
First, open the configuration file:
sudo nano /etc/docker/daemon.jsonPaste the following lines of code:
{
      "exec-opts": ["native.cgroupdriver=systemd"],
      "log-driver": "json-file",
      "log-opts": {
      "max-size": "100m"
   },
       "storage-driver": "overlay2"
       }
Save changes, exit from the text editor, and reload the configuration using the following command:
sudo systemctl daemon-reload && sudo systemctl restart dockerStep 10: The Kubernetes configuration
Don't worry, there's not much you have to do but paste a few lines of code as instructed here.
First, open the Kubernetes configuration file:
sudo nano /etc/default/kubeletPaste the following line:
KUBELET_EXTRA_ARGS="--cgroup-driver=cgroupfs"What it will do is provide you a fallback mechanism in the case where systemd is not working then it will use the cgroupfs.
Next, open the other Kubernetes configuration file using the following command:
sudo nano /etc/systemd/system/kubelet.service.d/10-kubeadm.confNow, add the following line after the last the Environment line:
Environment="KUBELET_EXTRA_ARGS=--fail-swap-on=false"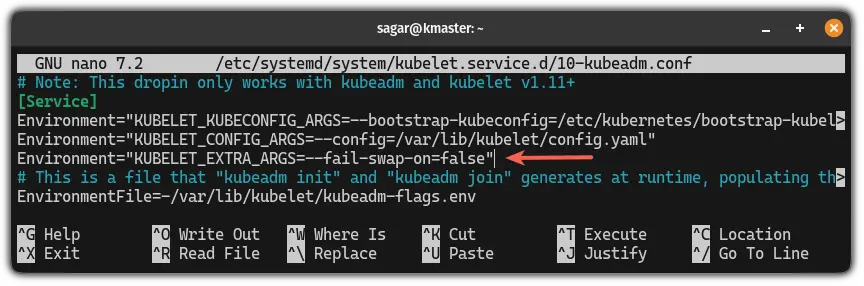
Save the changes and restart the service using the following command:
sudo systemctl daemon-reload && sudo systemctl restart kubelet
Steps for the master server
sudo kubeadm resetFirst, initiate Kubernetes using the following command structure:
sudo kubeadm init --control-plane-endpoint=[master-hostname] --upload-certsWait for a few minutes as the first-time execution takes a while.
Once done, you will see the following screen:
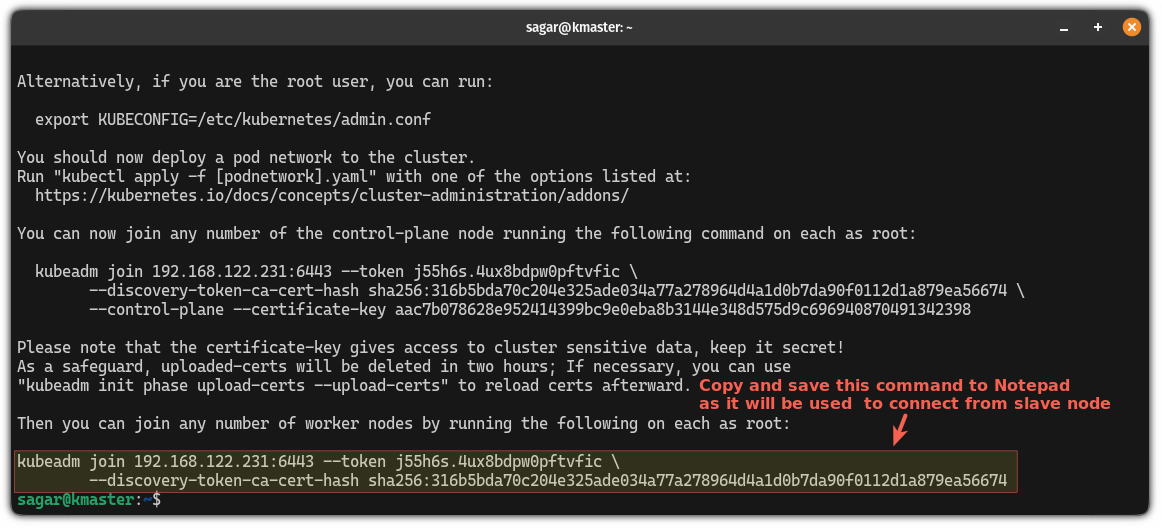
While it will suggest you use the highlighted kubadm join command, please note that if you use it right away, it will malfunction.
So select copy and save that command to Notepad or in a preferred text editor as it will be used in the last step.
As the prompt advised, let's start with creating directories:
mkdir -p $HOME/.kubeNext, copy the Kubernetes configuration file from its system-wide location to your user's home directory using the following command:
sudo cp -i /etc/kubernetes/admin.conf $HOME/.kube/configNow, use the chown command in the following manner to change the ownership of the Kubernetes file to match the user ID and group ID:
sudo chown $(id -u):$(id -g) $HOME/.kube/configNext, use the following command to install Flannel:
kubectl apply -f https://github.com/flannel-io/flannel/releases/latest/download/kube-flannel.yml
Also, untaint the node using the following command:
kubectl taint nodes --all node-role.kubernetes.io/control-plane-
Now, you retrieve information about the pods using the following:
kubectl get pods --all-namespaces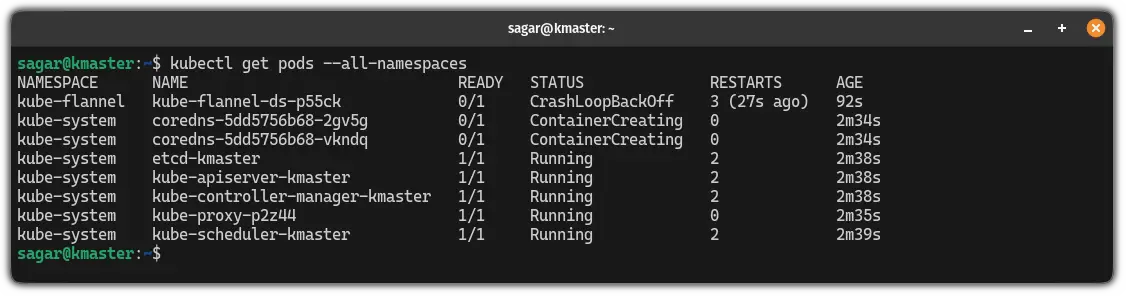
That's it from this side. Now, let's connect from the node.
Steps for the node (worker) server
There's nothing much to do here rather than connecting to the master server.
Remember, I asked you to save the command generated when you initiated Kubernetes on the master server?
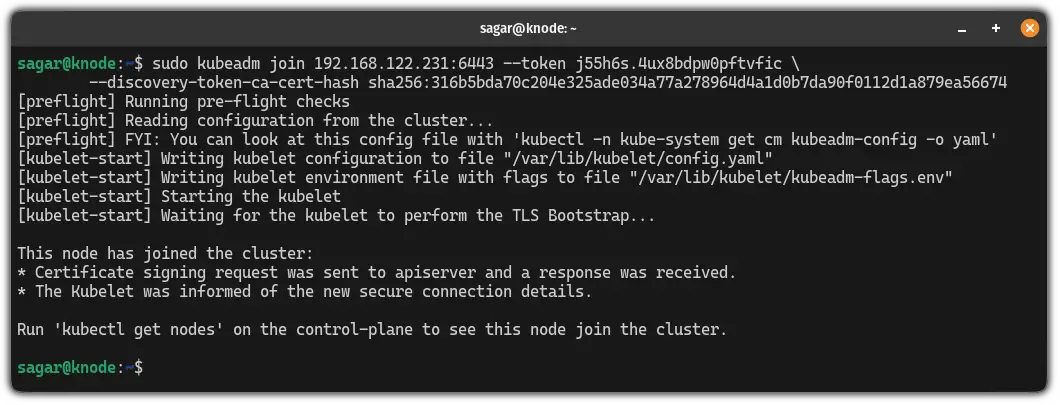
All you have to do is execute that command from the node.
My command looked like this:
sudo kubeadm join 192.168.122.231:6443 --token j55h6s.4ux8bdpw0pftvfic \
        --discovery-token-ca-cert-hash sha256:316b5bda70c204e325ade034a77a278964d4a1d0b7da90f0112d1a879ea56674
When executed, it will show the following output:
Verify connection from the master server
Switch to the master server and use the following command to see master and node are working properly or not:
kubectl get nodes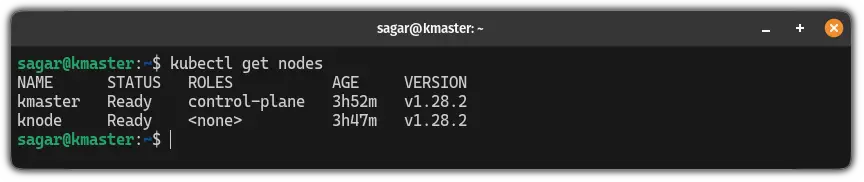
That's it from my side.
Wrapping Up
Through this tutorial, I explained how you can install and set Kubernetes on master and node (worker) clusters.
I hope you will find this guide helpful and that setting up Kubernetes will no longer be a complex task for you.

A software engineer who loves to tinker with hardware till it gets crashed. While reviving my crashed system, you can find me reading literature, manga, or watering my plants.