Check UFW Firewall Logs
Checking the firewall logs can tell you about the critical details for network security. Here's how to check UFW firewall logs in Ubuntu.

UFW logs allow users to check for incoming and outgoing packets which also include origin, destination, used protocol, and many other critical details that are crucial for network security.
Ubuntu comes preinstalled with UFW firewall. It supports logging, of course. But you may not have it enabled by default.
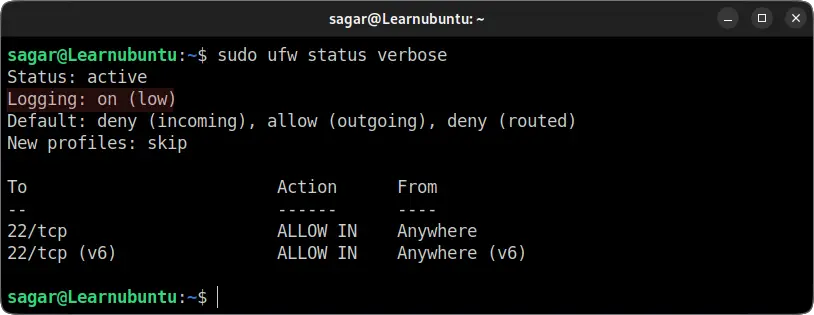
Check the firewall status like this:
sudo ufw status verbose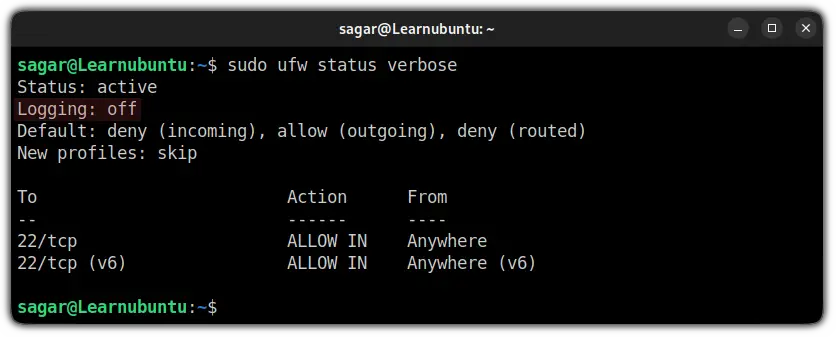
Did you notice the Logging: off in the second line of the output? That means that logging has not been activated yet.
And if you get the same output as mine, you can enable firewall logging by the following command:
sudo ufw logging on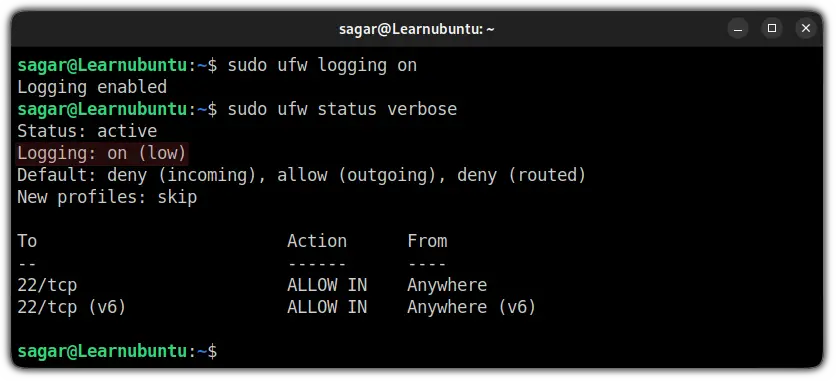
Since you have enabled the UFW firewall logging, you can check the firewall logs using the given command:
sudo less /var/log/ufw.log
And if you are curious to learn more about firewall logging including various levels of logging (you get low by default) and the meaning of each line in the log, you can refer to the given guide.

Check UFW Firewall logs in Ubuntu
The UFW firewall logs are located at /var/log/ufw.log meaning, you can use various ways to check the logs.
Using tail command
The tail command by default will print the last 10 lines of a specified file but when used with -f option, it will update UFW logs and will get you live coverage of logs:
tail -f /var/log/ufw.log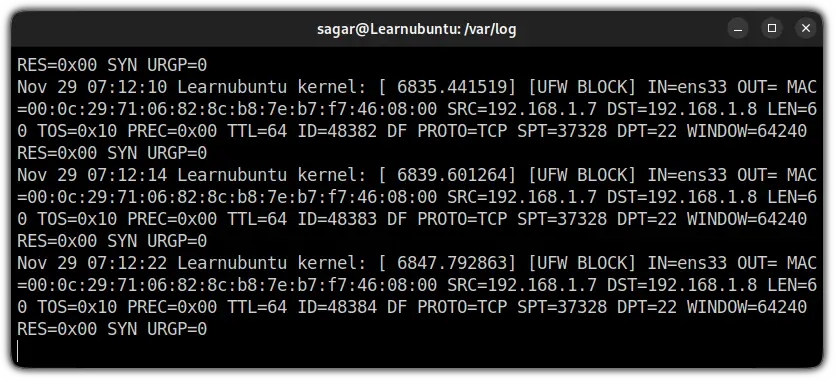
Using less command
The less command is used when you have to read the file containing hundreds or even thousands of lines and in that case, the less command is useful.
You can use the given command to check UFW firewall logs using the less command:
less /var/log/ufw.log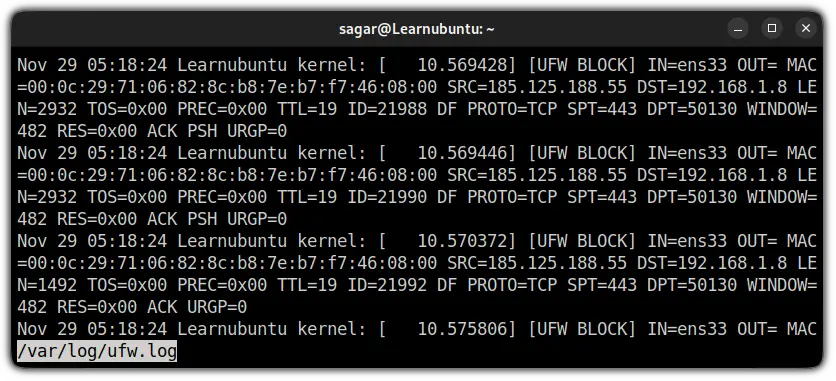
Using the grep command
The grep command is generally used to filter specific data from a file. And you will find the UFW firewall logs in the system and kernel logs too.
So you can use either of the two commands to check UFW firewall logs using the grep command:
grep -i ufw /var/log/sysloggrep -i ufw /var/log/kern.logNow, let's skip to the explanation part. And I will start with different levels of logging.
Meaning of the various logging levels in the UFW firewall
By default, the Logging level will be locked at the low level:
Including the low level, there are other 4 levels of firewall making it total 5 levels.
So let's have a look at what different levels of UFW logging offers:
off: Logging turned off meaning absolutely no information.low: Contains logs related to blocked packets that do not match firewall rules as well as packets matching logged rules.
You can define logging rules for UFW (which I will show you later in this guide) and it is known as logged rules.medium: In addition to the low level, you get all the invalid packets, new connections, and logging is done through rate limiting.high: logs packets with and without rate limiting.full: Same as high level but does not include rate limiting.
And to change your default/current level of logging, you just have to use the given command structure:
sudo ufw logging logging_levelSo if I want to change my logging level to the medium level, I'd have to use the given command:
sudo ufw logging medium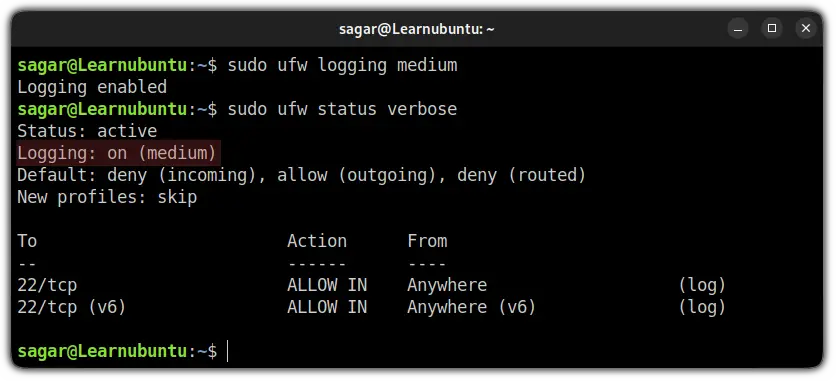
Add UFW log rule
As I mentioned earlier, you can add a log rule to monitor specific services.
It is quite easy and can be done using the following command syntax:
sudo ufw allow log service_nameFor example, if I want to log every SSH connection, I will have to use the given command:
sudo ufw allow log 22/tcp

Interpret UFW Firewall logs
When you look at UFW logs, it will show you the following output:
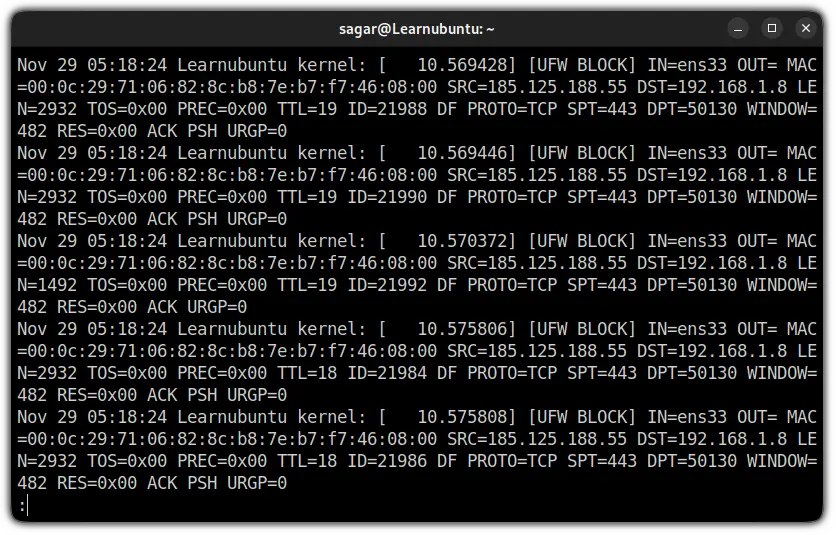
Now, let me break it done the log word by word.
Nov 29 05:18:24 Learnubuntu kernel: [ 10.575808]: Shows date, time hostname (Learnubuntu in my case), and kernel time since boot.[UFW BLOCK]: Most of the users will only see theUFW BLOCKas by default the logging is locked at a low level and will only indicate the blocked packages.
This meansUFW BLOCKwill show the packages which were against the UFW rules.
But if you are using different levels of logging or added logging rules, you might see different outputs. As I added SSH to the logging rule, it showed me[UFW ALLOW]:
IN =ens33: Here,INindicated to the network interface (mine is ens33) from which the packet has arrived.OUT: If this contains value means there was an outgoing event. But for me, it was blank which means there was no outgoing.MAC=00:0c:29:71:06:82:8c:b8:7e:b7:f7:46:08:00: Shows the combination of source and destination MAC address.SRC=192.168.1.7: The IP address of source, indicates the origin of the package.DST=192.168.1.8: The IP address of the packet's destination (should be your machine's IP).LEN=60: Length of the packet. Mine is showing 60 bytes.TOS=0x10: Indicates the type of service.0x10is hexadecimal used to indicate runtime service.PREC=0x00: Shows the precedence type of service.TTL=64: TTL (Time To Live). Which explains how long the package will bounce until it expires if no destination is specified.ID=34608: Indicates the unique ID for the IP datagram that will be shared by the fragments of the same packet.DF: Do not fragment the flag of TCP.PROTO=TCP: Used protocol for the transmission of packets. Mine is TCP.SPT=42874: Indicates the source port of the package.DPT=22: Shows the destination port of the package.WINDOW=64240: TCP window size.RES=0x00: Shows reserved bits.SYN URGP=0: Here, theSYNflag indicates the attempt to make a new connection but is equal to 0 means the attempt was blocked.
Wrapping Up
In this guide, I went through enabling and checking UFW firewall logs. I hope this guide will be helpful in your next network troubleshooting.
Please let me know if you have any queries or suggestions in the comments.